To determine odor emission characteristics by using common protocols and standardized olfactometry, from four mechanically-ventilated National Air Emissions Monitoring Study (NAEMS) sites, two dairy and two swine.
To develop a comprehensive chemical library that delineates the most significant odorants, and correlate this library with olfactometry results.
To disseminate information to stakeholders including producers, agencies, regulators, researchers, local government officials, consultants, and neighbors of animal operations.
Current Activities
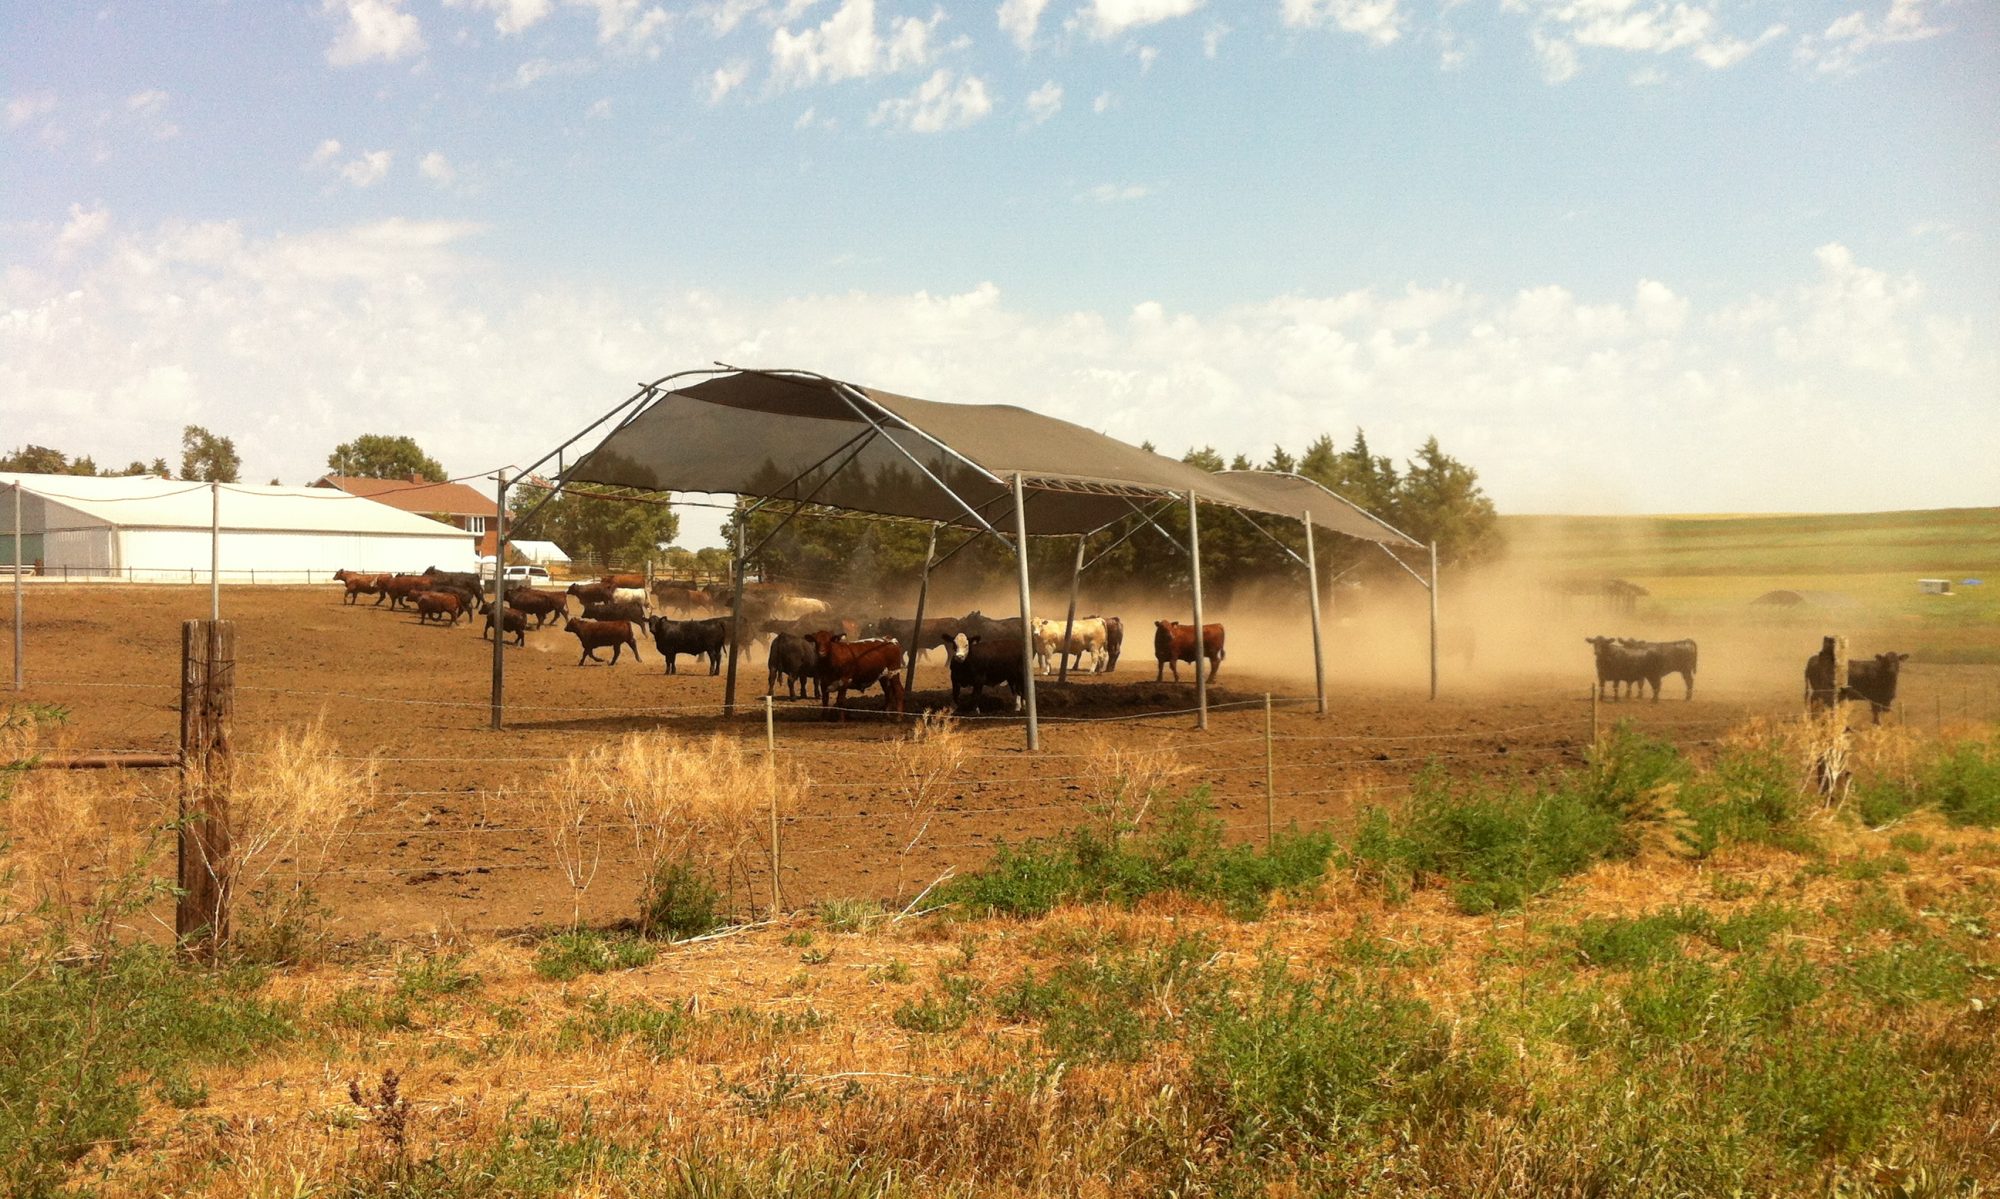
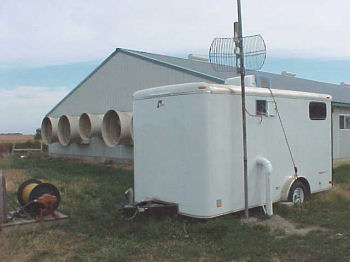
Data is being collected from the four NAEMS sites (dairy sites in Wisconsin and Indiana and pig sites in Iowa and Indiana). Data collection is about ¼ completed (first 13 week cycle completed in April, 2008 and second cycle started in May, 2008) Raw data compilation in a U of MN website based spreadsheets for this first round is nearly completed. Olfactometry data is being done at the U of MN, Iowa State, and Purdue labs while GC-MS data is analyzed at West Texas State University and GC-MS-O data is processed at Iowa State University.
What We Have Learned
Sorbent tubes for both GC-MS data and GC-MS-O data have been successfully used to trap VOC in the emissions streams from the four barns without “breakouts” occurring. Approximately 15 to 20 compounds are being identified and with airflow data, actual emission data of these compounds should be able to be calculated.
Why is This Important?
This study is supplementing the National Air Emissions Monitoring Study (NAEMS) with comprehensive measurements of odor emissions. The NAEMS will help livestock and poultry producers comply with EPA regulations concerning regulated gases and particulate matter by monitoring these pollutants continuously for 24 months, in order to determine which types of farms are likely to emit threshold levels of contaminants under the current regulations. Although odor plagues the animal industry with the greatest overall challenge, it is not included in the NAEMS, because the EPA does not regulate it and therefore did not include it in the Air Consent Agreement.
This project adds odor emission measurements at four NAEMS sites during 12 months of the study. Both standard human sensory measurements (using dynamic forced-choice olfactometry), and a novel chemical analysis technique (GC-MS-O) for odorous compounds found in these emissions is being done in this study. The sensory and chemical methods would be correlated to gain both quantitative and qualitative understanding of odor emissions from animal buildings.
For More Information
Contact Larry D Jacobson, University of Minnesota, BBE Department, 1390 Eckles Ave, St. Paul, MN 55108. email: jacob007@umn.edu or phone 612-625-8288.
Larry D. Jacobson, Ipek Celen and Brian Hetchler, University of Minnesota
This report was prepared for the 2008 annual meeting of the regional research committee, S-1032 “Animal Manure and Waste Utilization, Treatment and Nuisance Avoidance for a Sustainable Agriculture”. This report is not peer-reviewed and the author has sole responsibility for the content.
The objectives of this research project are to monitor the indoor air quality of a deep-pit; wean-to-finish pig building over one pig-growth cycle (six months) by semi-continuously measuring concentrations of ammonia (NH3), hydrogen sulfide (H2S), carbon dioxide (CO2), methane (CH4), and volatile organic compounds (VOCs) and intermittently measuring particulate matter (PM10) and odor. The project will also monitor semi-continuous emissions of NH3, H2S, CO2, CH4, and VOCs plus intermittent sampling of odor emissions from the barn’s pit and wall exhaust streams over the six month growth period. Energy usage, both electrical and LP gas usage will be measured for both pit and non-pit ventilated rooms over the pig growth, along with pig performance (daily gain, feed efficiency, and death loss) between the rooms.
Current Activities
A cooperating pork producer is being located in southern Minnesota with a tentative starting date of July 1, 2008 for data collection.
Does the Use of Pit Fans Make a Difference in Air Emissions from Deep-Pit Pig Barns?
Air emissions from tunnel ventilated pig finishing barns have been monitored and partitioned between pit and wall fans during the past two years in Minnesota. The results showed that a disproportionate amount of hydrogen sulfide (H2S) and ammonia (NH3) emissions were emitted from the deep pit finishing barn through pit fans even though it was concluded that “pit” ventilation has little effect on the barn’s indoor air quality (figure 1). Thus producers might be able to reduce emissions of these hazardous gases and the associated odor of these gases simply by limiting or not using pit ventilation fans. Such a strategy would save electrical energy use since larger more efficient wall fans could replace the less efficient pit fans.
Figure 1. Hydrogen Sulfide Emissions from a 1200 head pig finishing barn with varying pit ventilation rates during a winter (January 26 to March 4, 2006) period. Contributed to eXtension CC2.5
Why is This Important?
Data collected from the deep pit facility will be used to determine the benefit of pit fans to indoor air quality in swine wean to finish buildings and what impact the use of pit fans has on energy usage and gas, odor, and particulate matter emissions from this stage of pork production buildings .
For More Information
Jacobson, L.D., B.P. Hetchler, and D.R. Schmidt. 2007. Sampling pit and wall emission for H2S, NH3, CO2, PM, & odor from deep-pit pig finishing facilities. Presented at the International Symposium on Air Quality and Waste Management for Agriculture. Sept 15-19, 2007. Broomfield, CO. St. Joseph, Mich.: ASABE
Authors: Larry D. Jacobson, David Schmidt and Brian Hetchler, University of Minnesota
This report was prepared for the 2008 annual meeting of the regional research committee, S-1032 “Animal Manure and Waste Utilization, Treatment and Nuisance Avoidance for a Sustainable Agriculture”. This report is not peer-reviewed and the author has sole responsibility for the content.
Many dairy producers in the Great Lakes Region have abandoned year-around confinement feeding and have adopted a form of managed grazing where cattle are on pasture during the growing season and housed during the winter months. Pasture land is often nutrient deficient because crop nutrients are removed in harvested hay early in the growing season when forage supply exceeds grazing demand. Thinning stands are often a problem on a grazing farm, particularly after a dry summer when over-grazing occurs.
The objective of this work was to develop and evaluate a process whereby forage Brassica, grass and legume seed was carried in nutrient rich manure slurry to seeding micro-sites in small grain stubble or established pasture and hay ground. This shallow mixing of the seed-laden slurry increased the species richness, yield and quality of hay and grassland, extended the grazing season, and provided a more complete, balanced feed for grazing stock.
Activities
Slurry seeding was done with a commercially available slurry tanker (3000 gal) equipped with a rear-mounted rolling-tine aerator (Aer-Way) and a SSD (sub-surface deposition) slurry distribution system. The rolling-tine aerator was ground-driven with 8-inch tines on a rotating shaft with 7½ inch spacing between each set of tines. The angle of the rotating shaft was adjustable in 2.5º increments from 0º to 10º degrees relative to the direction of travel. The 0º gang angle provided little soil disturbance while the 10º gang angle provided the most soil loosening.
Seed was mixed directly in the spreader tank and applied with the manure slurry.
Slurry-seeding involved mixing seed in the slurry tank and passing the seed-laden slurry through a rotating chopper/distributor and then through drop tubes to the fractured and loosened soil behind each set of rolling tines. Excess PTO pump capacity provides bypass flow for seed mixing and distribution. Slurry rate calibration is based on tractor engine RPM, travel speed, machine width, and slurry flow rate. A 150 PTO-hp tractor or larger was needed to draw the slurry tank and aeration tool.
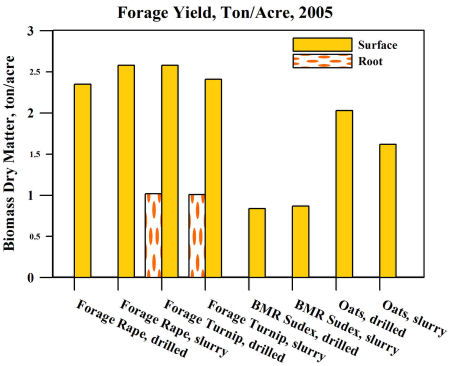
Forage rape (Barkant, 6 lb/ac), forage turnip (Pasja, 6 lb/ac), brown mid-rib sorghum-sudan (Sudex, 30 lb/ac) and common oats (64 lb/ac) were sown in untilled wheat stubble on a Capac sandy loam soil on 8 August. Two seeding methods were used: 1) conservation tillage with two passes of a combination tillage tool (12 ft Kongskilde Triple-K, 3-inch tillage depth), and 2) slurry seeding with aeration tillage and seed-laden swine slurry (10 gang angle, 6,000 gal/ac). Fifty lb/ac N as urea was applied to the tilled-and-drilled plots before tillage and planting. No commercial N was applied to the slurry-seeded plots. The sudex and oats were harvested on 21 October and the rape and turnip on 27 October.
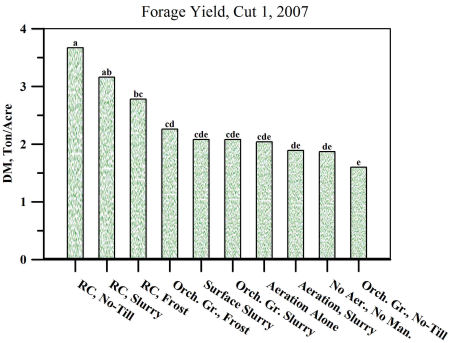
Orchard grass (12 lb/ac) and Medium Red Clover (10 lb/ac) were sown in an established brome grass sod using frost, no-till and slurry seeding methods. Frost seedings were done in March. On August 24, the brome grass in one-half of each plot was suppressed with Paraquat dichloride to reduce competition from the existing stand for sunlight and moisture. On August 31, seedings were no-till drilled (Great Plains drill) or slurry seeded (2.5 º gang angle) with 6,000 gal/ac swine manure. No commercial fertilizer was applied to the non-manured plots. Forage yield and quality were evaluated.
What We Have Learned
Slurry seeding late season forages after wheat
The weather was hot and dry in August. The tilled-and-drilled oat stand (43 plants/ft-sq) was significantly greater than the manure slurry-seeded oat stand (24 plants/ft-sq), but there was no difference between the till-and-drilled and slurry-seeded forage rape, forage turnip or sudex stands. Sudex did not establish well with either seeding method. Forage rape and forage turnip yielded greater than sorghum-sudan and oats, but there were no significant differences within a crop due to the seeding method.
Figure 1. Yield of late season grazing crops seeded with swine slurry in untilled wheat ground. Contributed to eXtension cc2.5
Slurry seeding forages in hay ground
Forage yield and quality parameters are under evaluation. Based on preliminary observations:
No-till and slurry seeding of red clover in a brome grass sod was more effective than frost seeding in increasing biomass yield and botanical diversity.
No-till and slurry seeding of orchard grass in brome grass sod increased botanical diversity but had little effect on biomass yield after the initial N boost. Frost seeding orchard grass had little effect on botanical diversity.
The use of a pre-plant burn-down tended to increase weed biomass.
The use of a pre-plant burn-down enhanced the inter-seeding of orchard grass, but it did not enhance the stand of red clover.
Forage dry matter yield, Cut 1 2007.
Why is This Important?
Manure slurry-enriched micro-site seeding is an innovative process that combines low disturbance aeration tillage, manure slurry application and the seeding of cover crops in one efficient operation. Manure nutrients collected throughout the winter can be used to meet the nutrient needs of hay and pasture crops but concerns regarding the effect of manure on pasture productivity limit its use. When applied to pasture and hay crop restoration this new process will increase botanical diversity, yield and quality, and provide a more complete, balanced feed for grazing stock. A more complete integration of pasture and manure nutrient management in grass-based systems offers an opportunity to expand the land base for manure application, minimize manure transport costs, improve on-farm nutrient recycling, and improve forage quality and farm profitability.
For More Information
Contact Tim Harrigan, harriga1@msu.edu or 517.353.0767. For more information refer to the following article: Harrigan, T.M., D.R. Mutch and S.S. Snapp. 2006. Slurry-Enriched Seeding of Biosuppressive Covers. Applied Engineering in Agriculture 22(6):827-834.
By Tim Harrigan and Rich Leep, Michigan State University
This report was prepared for the 2008 annual meeting of the regional research committee, S-1032 “Animal Manure and Waste Utilization, Treatment and Nuisance Avoidance for a Sustainable Agriculture”. This report is not peer-reviewed and the author has sole responsibility for the content.
Why Study Trees for Controlling Odors from Livestock and Poultry Buildings?
The objective of this research is to evaluate the bio-physical, economic and social efficacy of the use of Vegetative Environmental Buffers (VEBs) – purposefully planted linear arrangements of trees and shrubs – to incrementally mitigate livestock and poultry odor. Our research has demonstrated that tree barriers can help impede, alter, absorb, and/or dissipate livestock odor plumes and other emissions prior to contact with people. As air moves across vegetative surfaces, leaves and other aerial plant surfaces remove some of the dust, gas, and microbial constituents of airstreams. Trees and other woody vegetation also enhance localized air dispersion by increasing mechanical turbulence. Our research program into the efficacy of VEBs involves a multi-disciplinary, multi-species and multi-analytic perspective. Related: Archived webcast on “Trees, Shelterbelts, and Windbreaks for Mitigating Livestock and Poultry Odors“
Activities
The efficacy of VEBs in mitigating livestock and poultry odor is being examined from a three- pronged perspective measuring efficacy in:
field measured bio-physical terms (e.g. physical reductions in downwind movement of particulates, odor and ammonia and long-term tree health)
financial feasibility terms at the farm-level (e.g. total costs of VEB establishment and maintenance vs. producer willingness to pay), and
in terms of social approval of the use of VEBs (e.g. evaluation of the impact of VEBs on production site aesthetics and consumer willingness to pay for environmentally friendly meat products).
The quantification of physical odor mitigation via the use of VEBs is approached with field trials using full size VEB systems (multiple rows of trees) at working poultry and swine facilities as well as using scale models of these facilities for wind tunnel examinations and advanced computer simulation.
Custom rate financial data has been collected and applied to a range of livestock facilities (e.g. differing VEB designs, production scale, etc.) to calculate typical upfront and long-term costs. Producer willingness to pay has been determined via multi-state producer surveys. Social opinion data was collected via multi-state consumer focus groups (utilizing photo elicitation techniques) and a series of integrated social surveys.
Can Trees Reduce Odor Movement?
Baseline physical data suggests that VEBs can contribute up to a 10% reduction in the movement of odor downwind. The technology broadly applied at the farm level seems to be financially feasible to most swine producers – with total costs ranging from $0.01 to $0.33 per pig produced; these costs by and large being well below maximum producer willingness to pay for the use of VEBs. And social surveys in IA and NC show strong social support and appreciation of the use of trees for air quality purposes with strong social agreement that VEBs improve the aesthetics of confinement production.
Why is This Important?
Affordable, tertiary odor mitigation technology with the added benefit of being socially acceptable is a strong compliment to any comprehensive manure management program at production sites .
Read the following article: Tyndall, J.C. and J.P. Colletti. 2007. Mitigating Swine Odor with Strategically Designed Shelterbelt Systems: A Review. Agroforestry Systems. Volume 69, Number 1/January, 2007.
This report was prepared for the 2008 annual meeting of the regional research committee, S-1032 “Animal Manure and Waste Utilization, Treatment and Nuisance Avoidance for a Sustainable Agriculture”. This report is not peer-reviewed and the author has sole responsibility for the content.
Accumulated manure can cause health, odor, pest, and water quality problems if not properly managed. One option is to collect the waste daily, load it in a spreader, and spread it on cropland, hayland, or pasture (often referred to as a “daily haul” system). This is time consuming and also has to be done regardless of the soil moisture, weather, or time of year. Spreading during rain, on saturated or frozen soils can cause compaction or lead to offsite runoff of manure. Growing crops can also be damaged during spreading.
The alternative to daily spreading is to stockpile or store the manure for a period of time, at which point it may be spread or hauled away and utilized beneficially elsewhere. Even though the number of livestock on your farm may not be large, enough manure will be generated to pose a problem if planning is not done.
Example: A single horse can produce 50 pounds of manure per day which translates to 11 cubic yards and 9 tons annually. The manure and bedding produced by this horse in a year can exceed 25 cubic yards. This would require a storage area of about 12 feet by 12 feet with an accumulated depth of 3 to 5 feet for one year of storage, depending how much decomposition and compaction of the manure takes place.
Regardless of the type or size of manure storage, there are a few basic principles to always follow:
Keep the clean water clean. Any up-slope surface run-on should be diverted around the manure storage or animal lots by creating a small berm. Rooftop water can be directed via gutters, downspouts and possibly underground outlets so that it goes around animal lots and manure storage.
Treat the dirty water. Any rainfall landing on the manure pile or the livestock concentration areas should (preferably) be retained in the structure or settling basin. Over time, the water evaporates, leaving behind the solid materials to be collected and spread on fields. The liquid can also be directed to a treatment area, such as a well vegetated filter strip. The plants will slow the flow, settling solids (filtering the runoff) and utilizing the nutrients as they grow. This option requires regular management as the liquid flow may eventually cut a channel and create an unobstructed path to creeks, streams, ponds or other clean water. The solids from the manure may also accumulate and smother the vegetation. The goal is to direct the drainage over the vegetated area as evenly (like a sheet) as possible and regularly harvest the vegetation as hay or silage to remove prevent build up of nutrients.
Avoid flood-prone areas. Flood waters that can reach a manure storage location will transport manure downstream and cause extensive water quality problems.
Accessibility. Store the manure where it is easily accessible to load and unload. Efficiency is important in order to properly manage the manure facility. Make sure you can access the site in all types of weather conditions. If it is difficult to access the site, you are less likely to regularly manage or maintain it.
Avoid steep slopes when siting your storage location. The steeper the slope, the more difficult it is to manage the storage area, and the greater potential for offsite runoff. It may be necessary to build a small dirt berm (do not use manure for the berm) to prevent storm water from leaving the area and running downslope.
If you spread the stored manure on your own land, do so following a nutrient management plan that establishes the spreading rate per acre to match the nutrients available in the manure to the needs of the crop.
Manure Storage Considerations
Storage can be very simple or quite complex; very inexpensive or quite pricey. The choice depends on a number of factors.
Storage siting
The first thing to decide when contemplating storage is the location. The spot has to be very convenient to the animal housing, but there is more to consider. The storage must be located well outside of any stream floodplain, and should have a slight slope for drainage, but not slope so much that runoff can cause problems. It is important to prevent manure from being washed offsite to streams or lakes. Manure contains potential pollutants when it is not managed correctly. The bacteria, phosphorous, nitrogen, and organic matter pose risks to aquatic organisms and humans.
Odor management is another consideration when siting a storage facility. Look at wind direction as relates to dwellings. The final consideration is aesthetics. If possible, keep the facility out of view of neighbors and passers-by. Sometimes a screen of trees and shrubs can help, and also may reduce odor.
Storage sizing
The sizing of a storage facility depends upon three factors:
How many animals are on the farm, and how much of the manure is collected?
What is the time period the storage will be accumulating manure before emptying?
How much money is available for building the facility?
From the weights and volume cited above for a single horse, it is easy to see how a storage facility can get large quickly, with just a few animals. Also consider that the ideal length of time permanent storage should have capacity for is six months; the minimum should be 3 months. For information on how to calculate the amount of manure produced, visit Manure Production and Characteristics.
Options for Manure Storage
Stockpiling
Cost: Low
Stockpiling of manure is just what it sounds like- simply taking the solid manure and soiled livestock bedding and piling it up in a convenient location. This primitive method can be acceptable for the farm with just 1 or 2 horses or several sheep. However, the spot must be compacted and sealed so that rainfall landing on the pile cannot leach pollutants into the soil and ground water. Sometimes gravel in a packed pad works well, or stone dust is used. The area approaching the pad needs to be firm also to prevent rutting in wet periods. Also, the pile should have a very slight slope (1-3%) to facilitate drainage to a vegetated filter strip.
A stockpile can be covered with a plastic tarp to reduce odors, flies, and leaching concerns. Rainfall will run off to the edges and never penetrate the pile. The tarp will need to be anchored securely all around the edges. A filter strip of vegetation or (preferably) a small dirt berm is still needed on the downslope side.
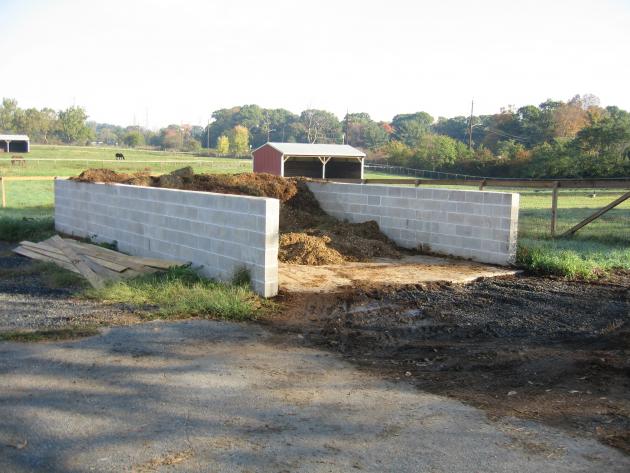
Dry Stack
Cost: Moderate
This is probably the most common and practical choice for the small livestock operation. A dry stack facility has three walls to contain the manure. The best ones have a poured concrete floor. The floor is slightly sloped for drainage out of the facility, and the drainage runs to an adjacent vegetative filter strip. The walls of a dry stack facility will be a minimum of four feet high. The walls, especially the back one opposing the entry, must be stout since the manure will be exerting outward pressure as the pile grows higher. Also, clean out is usually done with a front-end loader, and pushing will be done as the manure is scooped up. The walls can be poured concrete, cinder block, horizontal timbers, or vertical timbers. Secure anchoring below the frost line is crucial.
Composting
Cost: Moderate to High
The treatment of raw manure through composting is gaining in popularity. The final product is crumbly, low odor and resembles rich topsoil. It is often highly marketable. Composting reduces the amount of available nutrients, kills pathogens, reduces odor, and reduces manure volume. However, it requires management. A pile of manure left alone is not composting- it is decomposing, which is a big difference.
Composting requires a balance of nitrogen, carbon, oxygen, and liquid. When things are running properly, the center of the pile will reach 140 degrees, which kills pathogens and renders a relatively stable product. An untended decomposing pile has a nearly anaerobic core that produces objectionable odors when broken into. Although the center is often hot, it’s not hot enough to sanitize. Composting requires taking the pile’s temperature, and turning of the pile regularly to mix and aerate. Sometimes it will need water; other times it will need to be covered so it does not become saturated and lower the oxygen level to unacceptable levels.
Turning the pile is usually done with a small tractor equipped with a front bucket loader. There are many ways to set up the composting site. It could just be several long windrows, 4 – 6 feet high, on compacted ground or compacted gravel, or concrete. Or, there may be several small dry stack-type bays connected together side by side, and the manure is moved from one bay to the next, and the manure is mixed and aerated in the process. Manure and bedding, when properly mixed, can be transformed into compost in as little as six weeks.
Cost: Highest
Liquid storage is used by many larger dairy or swine farms. The waste is diluted with stall wash water and pumped to a lagoon or other holding location. From there the liquid effluent and the solids are pumped into an injector tank and spread in the field as a slurry, either sprayed on the surface or injected into the soil. Or, the effluent is spray irrigated and the solids are separated and spread in a conventional fashion. This type of storage and management system is usually the most complex and expensive, and is usually not practical for smaller livestock operations.
Sometimes, the best solution is to simply have a dumpster or some other form of semi portable holding structure, and place the manure in there. When needed, a waste management purveyor can pick it up for beneficial re-use on cropland that can use the organic matter and nutrients. Remember to still have a vegetative filter strip to treat the leachate draining from the dumpster as it drains away.
If the amount of manure being generated daily is small enough, a small manure spreader can serve as the storage device. When full, simply hook up the tractor and spread the waste in the cropland or hayland according to a nutrient management plan. Caution, though- if applying to pastureland, it is important to spread the manure about four weeks before a grazing cycle. Smothering of grasses can occur if the manure is applied too heavily. Parasite eggs in raw manure may cause an infestation problem on pastures.
Vegetated Filter Strip
It is crucial to have a vegetated filter strip to treat the runoff water coming from a manure pile or a concentrated livestock area. The combination of grass uptake, soil filtering and adsorption, and biological processes in the top inches of soil significantly reduces pollution potential of manure runoff. The filter should be established in a vigorous, thick stand of grasses adapted to the soil conditions at the site. Animals should be kept off of it, and it should be hayed at least twice a year to remove nutrients and encourage growth. On a flatter slope, the strip should be a minimum of 30 feet wide, wider if slope is steeper. A better option than a vegetative filter strip is a Vegetative Treatment System. See the article on What is a Vegetative Treatment System? or a runoff containment. To see all the runoff control options, see Do I need to control the barnyard or lot runoff on my small farm?
Managing Stockpiled Dry Manure on Small Farms
Flies and odors from stored manure can be reduced if good management is practiced.
Keep the manure as dry as possible.
Remove manure from the farm regularly during fly breeding season.
Try not to use insecticides or larvacides; naturally occurring fly predators- tiny, non-stinging wasps and parasites, are beneficial to the pile. Wasps are active during fly season and their activity is better in dry manure.
When cleaning out the storage, leave a couple of inches of dry manure over the bottom of the storage area to provide a population of fly parasites and predators. Manure removal can be staggered to leave one section per week to supply fly predators and parasites.
Remove a winter’s stockpile of manure during cold weather (<55°F) before fly breeding season.
Barnyard and Corral Management
Manure should not only be removed from stalls and barns, but corrals, barnyard areas, and sacrifice areas should be regularly cleaned to reduce flies, odor, and the potential for mud. A box scraper, skid loader, or tractor and loader can be used to remove manure built up on the surface of these areas. For more information, see the following publication: Sacrifice Areas.
Author: Fred Kelly, USDA Natural Resources Conservation Service, New Jersey
Scientists from USDA’s Agricultural Research Service (ARS) are taking a sideways look at odors, literally.
As anyone that has evaluated potential sites for swine facilities knows, many factors–such as wind speed, direction, topography, vegetation, and more–influence the potential impacts on downwind neighbors. In an effort to understand how air currents interact with the building site–and therefore pick up odors, dust, and other emissions–Tom Sauer and Jerry Hatfield, with the National Soil Tilth Laboratory in Ames, Iowa, built a model swine farm in a wind tunnel.
Research Activities
Air flow velocities and turbulence intensities were measured with a sensor that measured how quickly the winds carried heat away at 83 points behind the building models. They also took pictures of smoke patterns, generated by dry ice, to capture airflow patterns around the model structures and measured evaporation rates from the model storage tanks and lagoons. They reconfigured the model farm in different ways and repeated their measurements.
What Did They Learn?
Buildings situated perpendicular to airflow disrupted downwind airflow to a greater extent than buildings parallel to airflow. “These studies show how much the placement of animal housing units and manure-storage facilities can work in combination with prevailing winds and site conditions to affect the distance that potential agricultural air emissions can travel,” says Sauer. “They strongly indicate that we should be able to reduce the downwind air-quality impacts from animal production by modifying the layout of a production facility.”
Using model farm buildings, silos, and trees (wire mesh coils serve as trees), agronomist Guillermo Hernandez (left) and soil scientist Tom Sauer evaluate the effect of model arrangements on airflow. Hernandez makes an adjustment to one of the highly sensitive probes as Sauer monitors the real-time data signal. Photo courtesy of the USDA Ag Research Service.
This research is part of Air Quality, an ARS national program (#203).
Thomas J. Sauer and Jerry Hatfield are with the USDA-ARS National Soil Tilth Laboratory, 2110 University Blvd., Ames, IA 50011-3120; phone (515) 294-3416 [Sauer], (515) 294-5723 [Hatfield].
October, 2008 Newsletter Articles
EPA Releases “Report on the Environment 2008”
Poultry Waste Management Symposium To Be Held October 21-23
US Geological Survey National and Regional Trends in Ground-Water Quality
This summary was adapated from materials provided by the USDA ARS. It has not been peer reviewed and represents the newsletter editor’s summary of the research.
Developing a nutrient management plan can be a large undertaking. And once it is completed, implementing it puts a livestock producer well on the way to environmental stewardship. A plan may be written for one or more purposes: to satisfy regulatory programs, to qualify for financial assistance or maybe just to gain peace of mind.
The plan should have been developed in close working relationship with the producer, and in so doing, many of the management practices that needed improving will have been worked out and the producer understands the need for the practices and is willing and capable to achieve the items as detailed in the plan. No plan will ever be followed exactly as it was written as weather conditions, soil conditions and market fluctuations create a constant flux for any farming operation. But as these changes arise, the producer who has been involved in the development of the plan is also skilled in how to make changes that continue to be in the spirit of the plan for environmental protection, nutrient accounting and conservation needs. The plan is then teamed up with records that show the plan is either being followed, or documents any deviations.
The planning process needs to include strategic (long term) and tactical (annual) planning. A strategic plan needs to be developed for the whole farm. The strategic plan articulates the policies and guiding principles for the entire farm operation. This type of plan needs to present clear concise statements that reflect the farm’s commitment to conducting operations according to the plan. A good starting point is to create a Whole Farm Nutrient Balance Report This report will provide the farm with a snapshot of the nutrient flows onto and off of the farm. The ideal scenario would be for the nutrients imported onto the farm in feed and fertilizer to be balanced by the nutrients being removed in commodities that are sold off the farm. For farms that have more nutrients than the farm can deal with the options to consider include, reducing purchased inputs (fertilizer and feeds), moving nutrients off the farm, through manure or compost, acquiring more land or reducing animal numbers.
Once the farm knows where it stands with regard to nutrient balance it can begin to formulate the strategy needed to deal with the situation. Farms with too few nutrients or just enough nutrients needed to meet crop requirements can take a straightforward approach to developing a strategic level plan for the farm. In these situations the farm simply needs to commit to making maximum use of the available nutrients by applying the nutrients to a crop field when the field needs the nutrients and at a time of year when the crop can take them up. On the other hand the farm that has too many nutrients has a more complex problem. This farm also needs to apply nutrients to fields needing them when the crop can take them up, but it also needs to develop a strategy to deal with the excess nutrients.
Annual (Tactical) Planning
Plans should be reviewed annually, to see how closely last year’s actions matched the plan, to make any updates to the plan and to project ahead for the next twelve months. This annual update is the time to input any new soil tests, develop the coming crop rotation, document yields, add new fields or delete ones no longer farmed, update animal numbers and incorporate new manure analysis. If major changes are being planned or have occurred, the plan may need significant changes.
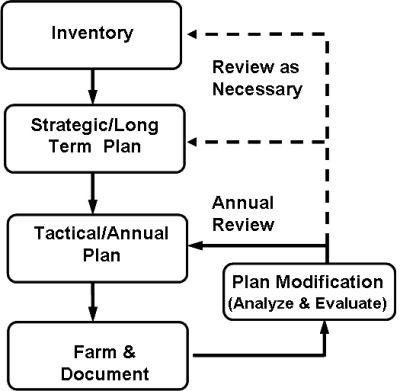
These factors will keep the plan current and meaningful. Conceptually, implementing a nutrient management plan can be thought of a cyclical process composed of a series of steps. Due to the continuous nature of farming several of the steps in the cycle may be happening simultaneously, but for clarity we will consider them one at a time. The figure below shows these steps and the cyclical arrangement of their relationship to each other.
There are instances where the annual/tactical plan can be functional for the coming year, but the strategic/long range plan indicates that annual planning will become more difficult each year. For some farms, it may be easy to nitrogen base the plan, but coming into phosphorus balance will be more difficult, or impossible. P-index strategies should be considered a short term solution; but when a farm is generating more phosphorus than it can utilize, eventually, a P-index strategy will lead to over applications of phosphorus and potential concerns in the years to come, especially if regulations and policy tightens nutrient planning in the future. There will be situations where livestock numbers increase on an operation but there is less land base in the neighborhood. Scenarios such as these, point to the importance of considering both the long term and the annual planning process.
Communicating the plan
Implementation of a plan often hinges on communicating the plan to other family members or hired employees. First, the farm owner needs to show, by his/her actions and words, that the plan is important. Next, a system of communications to the farm employees on what they should do to follow the plan and reporting back, by the employees, of what they have done needs to be put in place. If the farm doesn’t place sufficient value on the plan then the workers will have no incentive to follow the plan and it will collect dust on a shelf.
The tactical/annual plan will be a field-by-field, day-by-day, plan that needs to be communicated to the farm employees or family members. For some workers, training may be needed to impart the skills required to farm under the constraints of the plan. For example operators of manure spreading equipment may need to be taught how to adjust tractor gearing or throttle settings to obtain spreading rates as defined in the plan. This section of the plan will require things like:
Field 1 needs 2000 gallons of liquid manure applied per acre in the spring.
Field 4 needs to be harvested by September 1 in order to establish a cover crop to protect the slope from erosion during winter.
Field 25’s soil P levels are above threshold levels, no manure can be applied.
Field 6 needs 200 lbs. of potash.
Records of actions
In return, there needs to be a track record of what did occur, noting any changes to the planned activities. Records are critical to the process because they provide the proof that the plan is being adhered to, as well as valuable information to be used in the formulation of the following year’s plan. If your farming practices are questioned by a regulatory agency or an unhappy neighbor, your records may be your only defense.
Nutrient management plans need to be based on realistic yield information. CC 2.5 Rich Meinert.
There are a number of websites that can provide sample record keeping forms and field worksheets that can be used as is or modified to meet the specific needs of the farm. A couple of suggestions to get started are:
This section of plan implementation is where crop records get put to use. One needs to analyze the records kept, to determine on a field by field basis how closely the plan was followed. If the records deviate substantially from the plan the farm needs to provide a reason for the deviation. These explanations need to become part of the permanent crop records so that if someone looks back at the crop records he can obtain a clear picture of what happened and why. The farm may have experienced a wet spring and needed to remove manure from storage to avoid a discharge, but the only field that was dry enough to work had already been spread. By determining what happened and why, the farm presents a rationale to outsiders that it is being environmentally responsible.
Evaluation is the final determination of how well the plan worked. After the individual field comparisons are completed, summary information should be calculated to provide a report card on the nutrient management practices as a whole. It is this summary information that can point out the weak points in the plan. For instance, if fields consistently yield less than the yield goal in the plan then adjustments need to be made. If a number of fields are increasing in soil P over time the application rate for manure or fertilizer may need to be lowered to reduce the accumulation of P.
This management information is the hidden benefit of the NMP process. Detailed farm records will allow farms to use input costs, production data, operating costs and revenues to conduct cost/benefit analysis on production practices. This will allow the farm to see which aspects of the operation are helping or hindering profitability.
Another aspect of evaluating a NMP is to do periodic checks on practices and procedures. Farms need to take a proactive approach to quality control in the area of nutrient management. Manure and fertilizer spreader calibrations will change over time. Farm personnel will begin to forget practices and they do not perform the same task in exactly the same way every time. Field conditions can vary due to weather.
For these reasons farms need to conduct periodic spot checks of manure and fertilizer application. Results from these types of measurements can be used to verify how accurately practices are being followed, and will provide a measure of confidence for the accuracy of the farm’s records in the event of a complaint. For example, if a complaint were filed stating that the farm misapplied liquid manure, it would be in the farm’s best interest to not only produce the crop records to show what was applied, but also to show a series of spot check results, that showed that the applications made on the farm that year were accurate to within plus or minus a real number of gallons per acre. Knowing this confidence interval can provide an extra measure of assurance that the farm actually applied what it said it had.
Implementing a nutrient management plan on a farm can be a daunting task. There is a lot of information to be managed. There are decisions to be made and records to be kept. You don’t need to do it all at once. See what specific resources are available in your state and use this web site to provide suggestions that you can tailor to suit your situation. When a plan is written and implemented correctly a farm can learn a lot about itself, and how to position itself to be in business over the long term with a minimal environmental foot print.
Page Manager: Richard Meinert, Extension Educator, University of Connecticut
Reviewers: Rick Koelsch, University of Nebraska and Doug Beegle, Pennsylvania State University
The following web pages all list laboratories that offer manure testing services. None of these pages claims to have a comprehensive national list, but all have many labs along with contact information listed. You are likely to find one or more labs within reasonable distance for mailing samples.
Developing a nutrient management plan depends on testing manure for nutrient content. Your manure test results are only as good as your sample. This page outlines recommended ways to sample solid manure from open feedlots.
Sample During Loading
The recommended sampling for solid manure is to sample while loading the spreader. Sampling the manure pack in a barn directly has been shown to result in very variable results and is not recommended. Take at least 5 samples during the process of loading several spreader loads and save them in a bucket. When all of the samples are collected, thoroughly mix the samples and take a subsample from this to fill the lab manure test container.
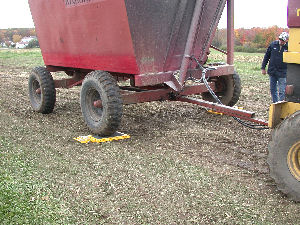
Sample Manure During Spreading
Spread a tarp or sheet of plastic in the field and spread manure over this with the manure spreader. Do this in several locations and with several loads of manure. Collect the manure from the tarp or plastic sheet in a bucket. Mix the manure collected from different locations and spreaders, and take a subsample from this to fill the lab manure test container. This procedure is usually only practical for more solid manures.
Photo courtesy USDA NRCS
Sampling Daily Haul Manure
Place a 5 gallon bucket under the barn cleaner 4 or 5 times while loading the spreader. When all of the samples are collected, thoroughly mix the samples and take a subsample from this to fill the lab manure test container. Repeat this several times throughout the year to determine variability over time.
Sampling Manure in a Poultry House
Collect 8-10 samples from throughout the house to the depth of the litter to be removed. Samples near feeders and waterers can be very different. Collect samples from these areas proportional to the space they occupy in the house. When all of the samples are collected, thoroughly mix the samples and take a subsample from this to fill the lab manure test container. A sample taken while loading the spreader or during spreading is likely to be a more representative sample.
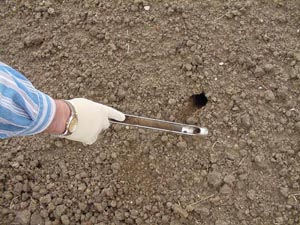
Sampling Stockpiled Litter
Take 10 samples from different locations around the pile at least 18 inches below the surface. When all of the samples are collected, thoroughly mix the samples and take a subsample from this to fill the lab manure test container. Large diameter auger bit and portable drill or soil sampler can be used to access manure deep within pile.
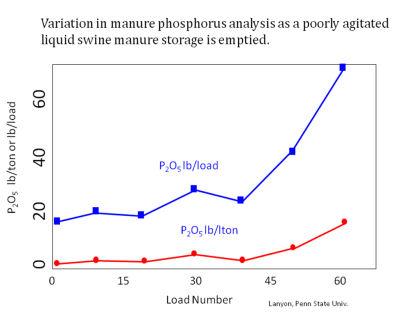
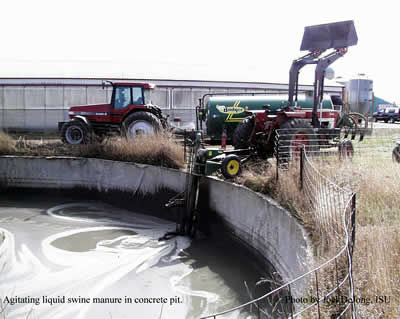
When testing manure, your nutrient management plan is only as good as your ability to obtain a representative sample. In liquid manure storage, agitation is critical to spreading uniform manure and to getting a representative sample. Agitating for 2-4 hours is the minimum. Depending on the type of storage longer agitation times may be required. The agitation for sampling should be similar to the agitation done when the storage is emptied. For this reason the most practical time to sample is when the storage is being emptied for field application.
If the storage is not adequately agitated there will likely be stratification. The figure below illustrates how manure analysis can vary within a storage without adequate agitation. In this example manure in the last 15 loads spread from this storage has 2 to 3 times more phosphorus than in the first 45 loads spread. If the storage is known to be stratified, separate samples should be taken as the manure consistency changes during emptying.
cc2.5 Les Lanyon
Sampling As Manure Storage Is Emptied
Agitate the storage thoroughly before sampling. Use a bucket to collect at least 5 samples during the process of loading several spreader loads and save them in the bucket. When all of the samples are collected, thoroughly mix the samples and take a subsample from this to fill the lab manure test container. When filling containers with liquid manure never fill the container more than ¾ full. If samples are collected over a several hour period, the bucket with manure sample should be stored on ice to limit ammonia losses.
Sampling a storage directly is much more difficult and likely to result in more variable results than sampling as the manure is loaded into the spreader. Agitate the storage thoroughly before sampling. Use a small bucket or tube to collect at least 5 samples from different locations in the storage. Combine these samples in a bucket and thoroughly mix the samples and take a subsample from this to fill the lab manure test container. When filling containers with liquid manure never fill the container more than ¾ full.
Liquid Manure Sampling Video
This video from the Iowa Learning Farms Project shows two sampling techniques for liquid manure storage prior to agitation. As indicated above, samples of agitated liquid manure should be obtained when possible, but in cases where the information from the lab analysis (which can take several days) is needed before manure can be applied to crop land.
This method is good for irrigated manure. Place buckets around the field to catch manure from the spreader or irrigation equipment. Place these to collect manure from more than one spreader load. Combine and mix the manure collected from different locations, and take a subsample from this to fill the lab manure test container. This method may give you “crop available ammonia nitrogen” as any ammonia losses may have already occurred prior to reaching bucket. What reaches the bucket is likely to soak into the soil and be available to the crop.
Page Authors: Douglas Beegle, Penn State University and John Peters, University of Wisconsin
Manage Cookie Consent
To provide the best experiences, we use technologies like cookies to store and/or access device information. Consenting to these technologies will allow us to process data such as browsing behavior or unique IDs on this site. Not consenting or withdrawing consent, may adversely affect certain features and functions.
Functional
Always active
The technical storage or access is strictly necessary for the legitimate purpose of enabling the use of a specific service explicitly requested by the subscriber or user, or for the sole purpose of carrying out the transmission of a communication over an electronic communications network.
Preferences
The technical storage or access is necessary for the legitimate purpose of storing preferences that are not requested by the subscriber or user.
Statistics
The technical storage or access that is used exclusively for statistical purposes.The technical storage or access that is used exclusively for anonymous statistical purposes. Without a subpoena, voluntary compliance on the part of your Internet Service Provider, or additional records from a third party, information stored or retrieved for this purpose alone cannot usually be used to identify you.
Marketing
The technical storage or access is required to create user profiles to send advertising, or to track the user on a website or across several websites for similar marketing purposes.