Because earthen manure and process generated wastewater storage structures are generally less expensive to build than above-ground metal or concrete tanks or below-ground concrete tanks, most operators choose earthen storage construction (ponds) where possible. To minimize potential for surface and ground water contamination, storage structures are located at least 150 feet from any uphill well, 500 feet from other wells, and 50 feet from the manure production/collection area (typically, animal housing). Check state and/or local regulations for specific setback distances for manure collection and storage structures in your area.
For gravity transfer of collected manure wastes to storage pond and possible settling basin use, sewer lines are generally installed on 1% slopes and sized for flow velocities greater than 2 feet per second. A waste storage pond should not be located in a flood plain nor should the bottom of the pond be constructed to a depth below the underground water table unless curtain drains or interception drains are installed around the perimeter of the pond at least 1 foot below the pond bottom.
Standards for Earthen Manure Storage Structures
Properly designed, installed and operated according to accepted engineering standards defined by USDA-NRCS and ASABE publications listed below under “Recommended Reading on Earthen Manure Containment Structures”, earthen manure structures should pose little risk to water quality.
Geology and Soils
Geologic conditions and treatments are determined from county soil surveys and performance of other waste storage ponds in the area and an on-site inspection. A backhoe under the direction of an experienced engineer, geologist, or soil scientist is one of the best subsurface soil investigation tools available.
An on-site subsurface soils investigation determines if the planned manure storage site has shallow soil over coarse sand and gravel, creviced limestone, or permeable bedrock. If any of these conditions exist, construction procedures and materials to prevent seepage to ground water, such as clay liners, geotextile or fabric liners, or concrete, are used.
As part of the animal waste management technical assistance program, Natural Resources Conservation Service (NRCS) currently offers on-site soils and geologic investigation assistance for animal waste management structures. NRCS should be contacted for assistance. Corrective treatments at some locations could be so costly that aboveground storage may be required or a waste management system at the site may be totally impractical. This could force moving an existing animal facility to a more suitable location and should definitely be a significant part of the site investigation process for new animal facility installations.
The pork industry has undergone a rapid change in the past two decades, with a decrease in farm numbers and an increase in farm size. These changes magnify the stress of the compatibility of pork production with neighbors in rural America. Concerns of the potential impact of the swine operation on water and air quality and health are also raised due to numerous compounds often produced from anaerobic degradation of animal manures, such as, sulfurous compounds, volatile fatty acids (VFAs), and ammonia (NH3). Since the pig is the point source of excreted nutrients resulting in gas and odor emissions, diet modification has the potential to reduce nutrient output and improve air quality.
Our hypothesis is that by utilizing a low nutrient excretion diet formulation and an alternative manure management strategy, the amount of nutrient output and gas/odor emissions will be reduced over the wean-finish period.
Activities
A total of 1, 920 pigs (initial BW = 5.29 kg) were used in a 2 x 2 factorial, wean-finish experiment to determine the effects of diet (control, CTL vs. low nutrient excretion, LNE) and manure management (6 mo. deep-pit, DP vs. monthly pull plug-recharge, PP) on growth performance, nutrient output, and air quality. Pigs were housed in a 12-room environmental building.
Pigs were split-sex and phase-fed to meet or exceed their nutrient requirements (NRC, 1998) at different stages of growth. The CTL and LNE diets were corn-soybean meal based and formulated to an equal Lysine:calorie. The LNE diet formulation had reduced CP and P, increased synthetic amino acids, phytase, non-sulfur trace mineral premix and added fat. Improvements in pig performance were observed over the wean-finish period.
Did Lysine Affect Performance or Odorous Emissions?
Pigs fed the LNE diets were 4.3 kg heavier (131.2 vs. 126.9 kg) at market, gain was increased by 0.03 kg/d (0.83 vs. 0.80 kg/d), feed intake was reduced by 0.16 kg/d (1.95 vs. 2.11 kg/d), and overall feed efficiency was increased by 11.6% (0.43 vs. 0.38) compared to CTL fed pigs (P<0.01). In addition, manure generation was reduced by 0.39 L/pig/d when the LNE diets were fed vs. the CTL diets (4.05 vs. 4.44 L/pig/d, P<0.008).
Excretion of total N, P, and K was reduced (P<0.001) by 27.5, 42.5, and 20.4%, respectively, from LNE fed pigs. Pigs fed the LNE diets had a 25.5, 23.8, 32.3, 18.5, 35.8, and 26.7% reduction (P<0.05) in manure acetate, iso-butyrate, iso-valerate, valerate, and total VFA production, respectively, compared to CTL fed pigs. Using the PP manure strategy reduced manure ammonium N and VFA production by 10.3 % (16.5 vs. 18.4 g/pig/d; P<0.002) and 20.5% (26.0 vs. 32.7 mM/pig/d; P<0.001), respectively, compared to DP strategy. Pigs fed LNE diets had a 13.6% (P<0.001) reduction in aerial NH3 emissions over the wean-finish period compared to pigs fed CTL diets. Aerial H2S and SO2 emissions and odor were not different (P>0.10) between dietary treatments.
Why is This Important?
Feeding LNE diet formulations are effective in reducing environmental impacts of pork production while maintaining growth performance. In addition, utilizing a monthly pull plug-recharge manure management strategy can improve air quality parameters, however can be more labor intensive.
By Scott Radcliffe, Brian Richert, Danielle Sholly, Ken Foster, Brandon Hollas, Teng Lim, Jiqin Ni, Al Heber, Alan Sutton – Purdue University
This report was prepared for the 2008 annual meeting of the regional research committee, S-1032 “Animal Manure and Waste Utilization, Treatment and Nuisance Avoidance for a Sustainable Agriculture”. This report is not peer-reviewed and the author has sole responsibility for the content.
A protocol was developed to determine the cost/benefit of installing a cover over a manure storage structure. Included are a discussion on the cost and selection of the cover, a procedure to determine the feasibility of biogas production and capture, the technique to estimate the dilution of the slurry resulting from precipitation, and tools to estimate ammonia emissions, thereby predict the increase in nitrogen content and the savings from reduced fertilizer hauling. By considering the combination of all of these factors, the payback period can be calculated.
Current Activity
The protocol has been developed and a case study was performed. A manuscript is in preparation.
What We Have Learned
Techniques to identify the items that determine the cost and benefit have been researched and refined for the protocol. Based on a sensitivity analysis a crucial benefit is the savings associated with keeping precipitation out of the manure thus avoiding extra hauling costs. As a result, relatively short payback periods can be realized.
Why is This Important
One of the most common practices to store manure is the use of open storage structures. Numerous problems for farmers are created by the open structure including ammonia loss, methane emissions, odor complaints, and increased hauling of manure slurry. Covering a lagoon offers substantial environmental benefits and can save farmers money.
For More Information
Steve Safferman
Michigan State University
Biosystems Engineering
202 Farrall Hall
East Lansing, MI 48824
This report was prepared for the annual meeting of the regional research committee, S-1032 “Animal Manure and Waste Utilization, Treatment and Nuisance Avoidance for a Sustainable Agriculture”. This report is not peer-reviewed and the author has sole responsibility for the content.
Accumulated manure can cause health, odor, pest, and water quality problems if not properly managed. One option is to collect the waste daily, load it in a spreader, and spread it on cropland, hayland, or pasture (often referred to as a “daily haul” system). This is time consuming and also has to be done regardless of the soil moisture, weather, or time of year. Spreading during rain, on saturated or frozen soils can cause compaction or lead to offsite runoff of manure. Growing crops can also be damaged during spreading.
The alternative to daily spreading is to stockpile or store the manure for a period of time, at which point it may be spread or hauled away and utilized beneficially elsewhere. Even though the number of livestock on your farm may not be large, enough manure will be generated to pose a problem if planning is not done.
Example: A single horse can produce 50 pounds of manure per day which translates to 11 cubic yards and 9 tons annually. The manure and bedding produced by this horse in a year can exceed 25 cubic yards. This would require a storage area of about 12 feet by 12 feet with an accumulated depth of 3 to 5 feet for one year of storage, depending how much decomposition and compaction of the manure takes place.
Regardless of the type or size of manure storage, there are a few basic principles to always follow:
Keep the clean water clean. Any up-slope surface run-on should be diverted around the manure storage or animal lots by creating a small berm. Rooftop water can be directed via gutters, downspouts and possibly underground outlets so that it goes around animal lots and manure storage.
Treat the dirty water. Any rainfall landing on the manure pile or the livestock concentration areas should (preferably) be retained in the structure or settling basin. Over time, the water evaporates, leaving behind the solid materials to be collected and spread on fields. The liquid can also be directed to a treatment area, such as a well vegetated filter strip. The plants will slow the flow, settling solids (filtering the runoff) and utilizing the nutrients as they grow. This option requires regular management as the liquid flow may eventually cut a channel and create an unobstructed path to creeks, streams, ponds or other clean water. The solids from the manure may also accumulate and smother the vegetation. The goal is to direct the drainage over the vegetated area as evenly (like a sheet) as possible and regularly harvest the vegetation as hay or silage to remove prevent build up of nutrients.
Avoid flood-prone areas. Flood waters that can reach a manure storage location will transport manure downstream and cause extensive water quality problems.
Accessibility. Store the manure where it is easily accessible to load and unload. Efficiency is important in order to properly manage the manure facility. Make sure you can access the site in all types of weather conditions. If it is difficult to access the site, you are less likely to regularly manage or maintain it.
Avoid steep slopes when siting your storage location. The steeper the slope, the more difficult it is to manage the storage area, and the greater potential for offsite runoff. It may be necessary to build a small dirt berm (do not use manure for the berm) to prevent storm water from leaving the area and running downslope.
If you spread the stored manure on your own land, do so following a nutrient management plan that establishes the spreading rate per acre to match the nutrients available in the manure to the needs of the crop.
Manure Storage Considerations
Storage can be very simple or quite complex; very inexpensive or quite pricey. The choice depends on a number of factors.
Storage siting
The first thing to decide when contemplating storage is the location. The spot has to be very convenient to the animal housing, but there is more to consider. The storage must be located well outside of any stream floodplain, and should have a slight slope for drainage, but not slope so much that runoff can cause problems. It is important to prevent manure from being washed offsite to streams or lakes. Manure contains potential pollutants when it is not managed correctly. The bacteria, phosphorous, nitrogen, and organic matter pose risks to aquatic organisms and humans.
Odor management is another consideration when siting a storage facility. Look at wind direction as relates to dwellings. The final consideration is aesthetics. If possible, keep the facility out of view of neighbors and passers-by. Sometimes a screen of trees and shrubs can help, and also may reduce odor.
Storage sizing
The sizing of a storage facility depends upon three factors:
How many animals are on the farm, and how much of the manure is collected?
What is the time period the storage will be accumulating manure before emptying?
How much money is available for building the facility?
From the weights and volume cited above for a single horse, it is easy to see how a storage facility can get large quickly, with just a few animals. Also consider that the ideal length of time permanent storage should have capacity for is six months; the minimum should be 3 months. For information on how to calculate the amount of manure produced, visit Manure Production and Characteristics.
Options for Manure Storage
Stockpiling
Cost: Low
Stockpiling of manure is just what it sounds like- simply taking the solid manure and soiled livestock bedding and piling it up in a convenient location. This primitive method can be acceptable for the farm with just 1 or 2 horses or several sheep. However, the spot must be compacted and sealed so that rainfall landing on the pile cannot leach pollutants into the soil and ground water. Sometimes gravel in a packed pad works well, or stone dust is used. The area approaching the pad needs to be firm also to prevent rutting in wet periods. Also, the pile should have a very slight slope (1-3%) to facilitate drainage to a vegetated filter strip.
A stockpile can be covered with a plastic tarp to reduce odors, flies, and leaching concerns. Rainfall will run off to the edges and never penetrate the pile. The tarp will need to be anchored securely all around the edges. A filter strip of vegetation or (preferably) a small dirt berm is still needed on the downslope side.
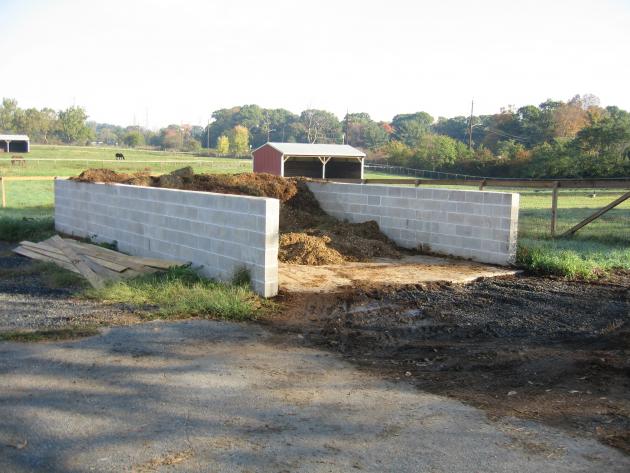
Dry Stack
Cost: Moderate
This is probably the most common and practical choice for the small livestock operation. A dry stack facility has three walls to contain the manure. The best ones have a poured concrete floor. The floor is slightly sloped for drainage out of the facility, and the drainage runs to an adjacent vegetative filter strip. The walls of a dry stack facility will be a minimum of four feet high. The walls, especially the back one opposing the entry, must be stout since the manure will be exerting outward pressure as the pile grows higher. Also, clean out is usually done with a front-end loader, and pushing will be done as the manure is scooped up. The walls can be poured concrete, cinder block, horizontal timbers, or vertical timbers. Secure anchoring below the frost line is crucial.
Composting
Cost: Moderate to High
The treatment of raw manure through composting is gaining in popularity. The final product is crumbly, low odor and resembles rich topsoil. It is often highly marketable. Composting reduces the amount of available nutrients, kills pathogens, reduces odor, and reduces manure volume. However, it requires management. A pile of manure left alone is not composting- it is decomposing, which is a big difference.
Composting requires a balance of nitrogen, carbon, oxygen, and liquid. When things are running properly, the center of the pile will reach 140 degrees, which kills pathogens and renders a relatively stable product. An untended decomposing pile has a nearly anaerobic core that produces objectionable odors when broken into. Although the center is often hot, it’s not hot enough to sanitize. Composting requires taking the pile’s temperature, and turning of the pile regularly to mix and aerate. Sometimes it will need water; other times it will need to be covered so it does not become saturated and lower the oxygen level to unacceptable levels.
Turning the pile is usually done with a small tractor equipped with a front bucket loader. There are many ways to set up the composting site. It could just be several long windrows, 4 – 6 feet high, on compacted ground or compacted gravel, or concrete. Or, there may be several small dry stack-type bays connected together side by side, and the manure is moved from one bay to the next, and the manure is mixed and aerated in the process. Manure and bedding, when properly mixed, can be transformed into compost in as little as six weeks.
Cost: Highest
Liquid storage is used by many larger dairy or swine farms. The waste is diluted with stall wash water and pumped to a lagoon or other holding location. From there the liquid effluent and the solids are pumped into an injector tank and spread in the field as a slurry, either sprayed on the surface or injected into the soil. Or, the effluent is spray irrigated and the solids are separated and spread in a conventional fashion. This type of storage and management system is usually the most complex and expensive, and is usually not practical for smaller livestock operations.
Sometimes, the best solution is to simply have a dumpster or some other form of semi portable holding structure, and place the manure in there. When needed, a waste management purveyor can pick it up for beneficial re-use on cropland that can use the organic matter and nutrients. Remember to still have a vegetative filter strip to treat the leachate draining from the dumpster as it drains away.
If the amount of manure being generated daily is small enough, a small manure spreader can serve as the storage device. When full, simply hook up the tractor and spread the waste in the cropland or hayland according to a nutrient management plan. Caution, though- if applying to pastureland, it is important to spread the manure about four weeks before a grazing cycle. Smothering of grasses can occur if the manure is applied too heavily. Parasite eggs in raw manure may cause an infestation problem on pastures.
Vegetated Filter Strip
It is crucial to have a vegetated filter strip to treat the runoff water coming from a manure pile or a concentrated livestock area. The combination of grass uptake, soil filtering and adsorption, and biological processes in the top inches of soil significantly reduces pollution potential of manure runoff. The filter should be established in a vigorous, thick stand of grasses adapted to the soil conditions at the site. Animals should be kept off of it, and it should be hayed at least twice a year to remove nutrients and encourage growth. On a flatter slope, the strip should be a minimum of 30 feet wide, wider if slope is steeper. A better option than a vegetative filter strip is a Vegetative Treatment System. See the article on What is a Vegetative Treatment System? or a runoff containment. To see all the runoff control options, see Do I need to control the barnyard or lot runoff on my small farm?
Managing Stockpiled Dry Manure on Small Farms
Flies and odors from stored manure can be reduced if good management is practiced.
Keep the manure as dry as possible.
Remove manure from the farm regularly during fly breeding season.
Try not to use insecticides or larvacides; naturally occurring fly predators- tiny, non-stinging wasps and parasites, are beneficial to the pile. Wasps are active during fly season and their activity is better in dry manure.
When cleaning out the storage, leave a couple of inches of dry manure over the bottom of the storage area to provide a population of fly parasites and predators. Manure removal can be staggered to leave one section per week to supply fly predators and parasites.
Remove a winter’s stockpile of manure during cold weather (<55°F) before fly breeding season.
Barnyard and Corral Management
Manure should not only be removed from stalls and barns, but corrals, barnyard areas, and sacrifice areas should be regularly cleaned to reduce flies, odor, and the potential for mud. A box scraper, skid loader, or tractor and loader can be used to remove manure built up on the surface of these areas. For more information, see the following publication: Sacrifice Areas.
Author: Fred Kelly, USDA Natural Resources Conservation Service, New Jersey
Developing a nutrient management plan depends on testing manure for nutrient content. Your manure test results are only as good as your sample. This page outlines recommended ways to sample solid manure from open feedlots.
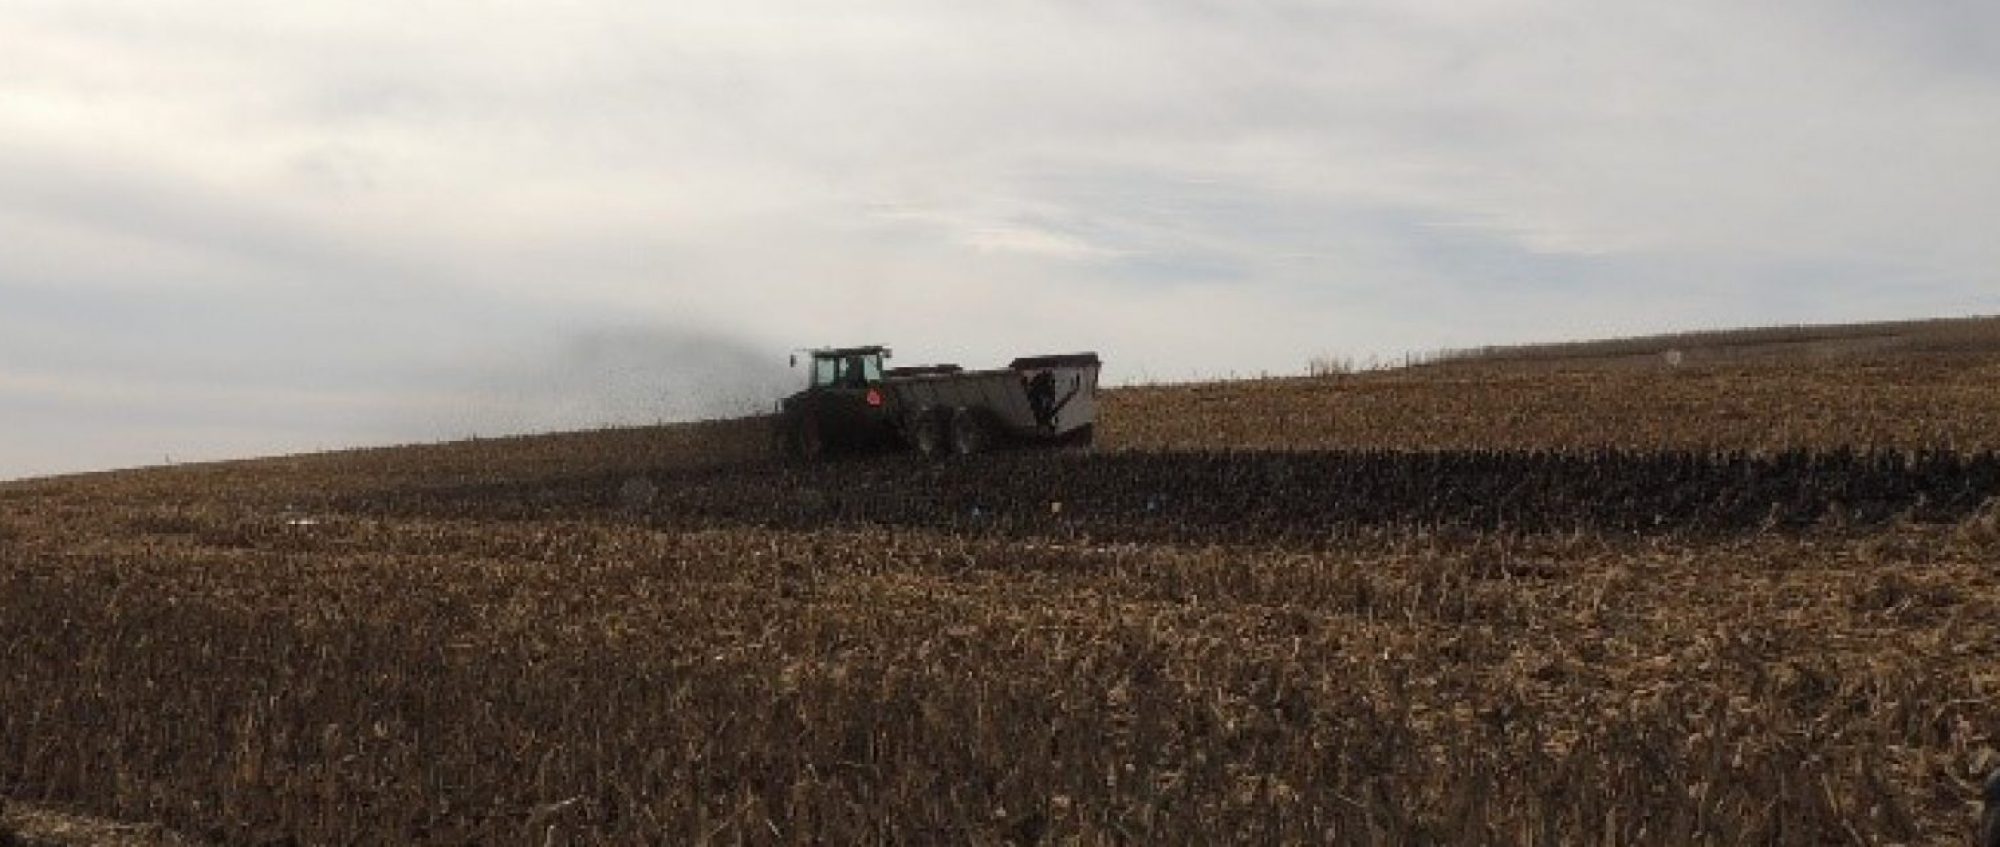
Sample During Loading
The recommended sampling for solid manure is to sample while loading the spreader. Sampling the manure pack in a barn directly has been shown to result in very variable results and is not recommended. Take at least 5 samples during the process of loading several spreader loads and save them in a bucket. When all of the samples are collected, thoroughly mix the samples and take a subsample from this to fill the lab manure test container.
Sample Manure During Spreading
Spread a tarp or sheet of plastic in the field and spread manure over this with the manure spreader. Do this in several locations and with several loads of manure. Collect the manure from the tarp or plastic sheet in a bucket. Mix the manure collected from different locations and spreaders, and take a subsample from this to fill the lab manure test container. This procedure is usually only practical for more solid manures.
Photo courtesy USDA NRCS
Sampling Daily Haul Manure
Place a 5 gallon bucket under the barn cleaner 4 or 5 times while loading the spreader. When all of the samples are collected, thoroughly mix the samples and take a subsample from this to fill the lab manure test container. Repeat this several times throughout the year to determine variability over time.
Sampling Manure in a Poultry House
Collect 8-10 samples from throughout the house to the depth of the litter to be removed. Samples near feeders and waterers can be very different. Collect samples from these areas proportional to the space they occupy in the house. When all of the samples are collected, thoroughly mix the samples and take a subsample from this to fill the lab manure test container. A sample taken while loading the spreader or during spreading is likely to be a more representative sample.
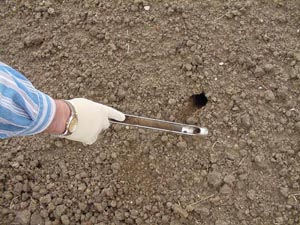
Sampling Stockpiled Litter
Take 10 samples from different locations around the pile at least 18 inches below the surface. When all of the samples are collected, thoroughly mix the samples and take a subsample from this to fill the lab manure test container. Large diameter auger bit and portable drill or soil sampler can be used to access manure deep within pile.
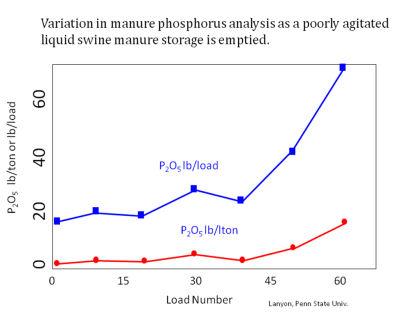
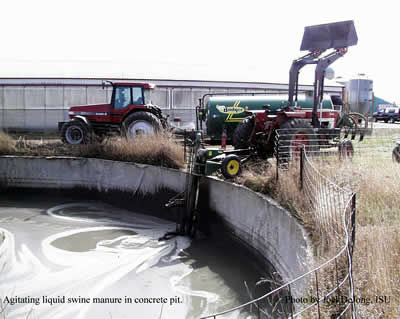
When testing manure, your nutrient management plan is only as good as your ability to obtain a representative sample. In liquid manure storage, agitation is critical to spreading uniform manure and to getting a representative sample. Agitating for 2-4 hours is the minimum. Depending on the type of storage longer agitation times may be required. The agitation for sampling should be similar to the agitation done when the storage is emptied. For this reason the most practical time to sample is when the storage is being emptied for field application.
If the storage is not adequately agitated there will likely be stratification. The figure below illustrates how manure analysis can vary within a storage without adequate agitation. In this example manure in the last 15 loads spread from this storage has 2 to 3 times more phosphorus than in the first 45 loads spread. If the storage is known to be stratified, separate samples should be taken as the manure consistency changes during emptying.
cc2.5 Les Lanyon
Sampling As Manure Storage Is Emptied
Agitate the storage thoroughly before sampling. Use a bucket to collect at least 5 samples during the process of loading several spreader loads and save them in the bucket. When all of the samples are collected, thoroughly mix the samples and take a subsample from this to fill the lab manure test container. When filling containers with liquid manure never fill the container more than ¾ full. If samples are collected over a several hour period, the bucket with manure sample should be stored on ice to limit ammonia losses.
Sampling a storage directly is much more difficult and likely to result in more variable results than sampling as the manure is loaded into the spreader. Agitate the storage thoroughly before sampling. Use a small bucket or tube to collect at least 5 samples from different locations in the storage. Combine these samples in a bucket and thoroughly mix the samples and take a subsample from this to fill the lab manure test container. When filling containers with liquid manure never fill the container more than ¾ full.
Liquid Manure Sampling Video
This video from the Iowa Learning Farms Project shows two sampling techniques for liquid manure storage prior to agitation. As indicated above, samples of agitated liquid manure should be obtained when possible, but in cases where the information from the lab analysis (which can take several days) is needed before manure can be applied to crop land.
This method is good for irrigated manure. Place buckets around the field to catch manure from the spreader or irrigation equipment. Place these to collect manure from more than one spreader load. Combine and mix the manure collected from different locations, and take a subsample from this to fill the lab manure test container. This method may give you “crop available ammonia nitrogen” as any ammonia losses may have already occurred prior to reaching bucket. What reaches the bucket is likely to soak into the soil and be available to the crop.
Waste storage pits and indoor tanks are generally under-floor inside the dairy, swine (and sometimes poultry) housing. Waste storage ponds and above ground storage tanks are fenced and posted to keep young children, livestock, and other unauthorized visitors away. Pond banks are seeded or sodded with a good grass cover to prevent soil erosion and mowed regularly to control grass and weed growth.
Recommendations for siting, design, and construction of manure storage units are provided in ASABE Technical Library EP393.3 Manure Storages. These recommendations are for both earthen and fabricated structures.
Storage Volume
Storage volume considerations include daily animal manure and related wash/flush water inputs. Dairy cattle generally generate larger manure volumes per live weight than swine, beef, or poultry. A mature dairy cow weighing 1,400 pounds can generate around 14 gallons (about 120 pounds or 1.9 cubic feet) of feces and urine each day with an average as-excreted solids content of around 12 percent.
The total excrement for cows housed in freestall total confinement, along with milking wash wastes would bring the total to more than 2.5 cubic feet per cow per day. For 100 cows, this is nearly 9 tons and 9+ cubic yards of manure per day. For cows on pasture part-time, manure handling and storage needs would be less and in direct proportion to actual confinement time. A 100-cow herd on half-time pasture would accumulate nearly 5 cubic yards (4.5 tons) of manure per day in confinement, including milk wash wastes. This daily manure volume for the confinement operation is multiplied by the planned storage period days to get the manure storage volume for the planned storage period.
Outdoor Storage Pond Volume
Outside storage pond or uncovered tank volume must also include expected rainfall minus evaporation from the storage surface. In high rainfall areas like the Southeastern US this could be 12 to 14 inches annually. In all geographical locations, this is based on the planned storage interval worst case and on local rainfall and evaporation figures. Volume must also include space for the 25-year-24-hour rainstorm event and any resulting watershed runoff into the pond. Roof and other rainfall runoff may or may not be included, depending on whether dilution water is needed for irrigation or not needed for tank wagon application of dairy waste.
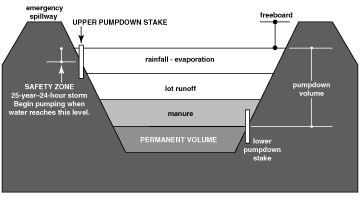
In addition, the volume of the storage pond should also include an allowance of at least 1 foot of freeboard above expected full level for overflow cushion protection and an allowance of at least 2 feet of depth on the bottom of the pond for materials not removed during the normal agitation-pumpout procedure. Storage pond pumpout must be carried out within the planned storage period. Pumpout should be started in time to insure that space is available to hold the 25-year-24-hour rainstorm.
Irrigating with Animal Waste
Waste irrigation equipment or tank wagons and specially designed pumps must be available, with tractors large enough to handle the horsepower requirements. Both agitation before pumpout and manure solids handling pumps matched to either the slurry irrigation system or “honey wagon” transfer tank are critical to successful waste storage pond pumpout. See the figure below for a cross section of a waste storage pond. Note the upper pumpdown stake. Pumping should begin when water reaches this level.
Cross section of a waste storage pond. Contributed to eXtension CC2.5
Irrigating with slurry calls for special equipment designed to handle both the high solids content and high fertilizer content of the waste.
Manure storage and handling systems enable livestock producers to efficiently utilize all the components in their manure management system. A typical manure management system will include some or all of the following components.
Area where manure is produced (ie. feedlot, freestall barn, confinement building).
Manure treatment area (solids separator, digester, aerator).
The purpose of manure collection and handling systems is to efficiently gather and move manure among these components of a manure management system.
Manure Collection and Handling Equipment
The type of equipment and procedures used to collect and handle manure depends primarily upon the consistency or “thickness” of the manure. The term “solids content” or “percent solids” is often used to describe this characteristic in manure. Different species of livestock excrete manure with different percent solids.
As can be seen in Figure 20-1, the percent solids of manure excreted by swine, beef and dairy falls within a rather narrow range (10 to 13 percent solids), while poultry manure is excreted at a considerably higher solids content. The solids content of excreted manure is often changed by such processes as adding bedding, drying manure on a lot surface, adding washwater or dewatering the manure by solids separation.
The terms “solid” (greater than 15% solids), “slurry” (5 to 15% solids) and “liquid” (0 to 5% solids) are typically used within the livestock industry to describe the characteristics of a particular manure. Solid manure will “stack” to some degree with minimal seepage of free water from the pile depending upon moisture content. Slurry manure has fluid characteristics and tends to flow like a thick chocolate malt. Liquid manure has flow characteristics similar to that of water.
The following pages contain additional information related to each manure type.
There are many options for the handling and storage of liquid manure. This page describes and differentiates some of the most common systems.
Anaerobic Treatment Lagoons Compared to Aerobic Lagoons and Storage Ponds
Most agricultural treatment lagoons are anaerobic lagoons. Anaerobic lagoons are earthen structures, which look at first glance like farm ponds. These lagoons are designed to provide biological treatment and long term storage of animal waste. Anaerobic lagoons are larger than manure storage basins, which do not provide significant biological treatment or long storage periods, but smaller than aerobic lagoons. Even though aerobic lagoons are designed to provide a higher degree of treatment with fewer odors, anaerobic lagoons decompose more organic matter per unit volume. Because of their treatment and storage capabilities anaerobic lagoons are a good compromise between storage basins and aerobic lagoons.
Anaerobic treatment of waste occurs without free oxygen to liquefy or degrade high BOD (biochemical oxygen demand) organic waste. With proper design and management the anaerobic lagoon can function for years. Odor from a well-designed and well-managed lagoon will be only slightly musty; foul odor indicates a malfunction requiring corrective action.
Advantages of Anaerobic Lagoons
Advantages of anaerobic lagoon systems are: manure can be handled with water flushing systems, sewer lines, pumps, and irrigation equipment; the high degree of stabilization reduces odors during land application; high nitrogen reduction minimizes the land area required for liquid effluent disposal, and long-term storage is provided at low cost.
Disadvantages of Anaerobic Lagoons
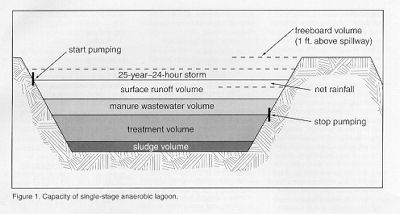
Disadvantages of anaerobic lagoons include: public perception that a lagoon is an open container of manure; offensive odors if improperly designed and maintained, and limited nitrogen availability if manure is used as a fertilizer. Lagoon design is based on the manure volume produced by the animals, plus any wash down water or wasted feed. An impoundment outside in the weather must also have space for runoff which may enter the impoundment, and rainfall less evaporation, that will occur over the storage area. Additional space for a 25-year 24-hour rainfall event and required freeboard is also necessary. Lagoons must have volume for all of the above plus the minimum pool or treatment volume to allow biological degradation, and in some cases, volume for sludge accumulation.
Contributed to eXtension CC2.5
Although emergency spillways as shown in the accompanying figures have the purpose of protecting embankments from overtopping and washing away during emergency weather situations (hurricanes, etc.), some states (i.e., Arkansas, at this writing) do not include these structures in lagoon and storage pond design requirements to save on construction costs.
University of Missouri Extension Publication EQ387, Anaerobic Lagoons for Storage/Treatment of Livestock Manure, by Donald L. Pfost and Charles D. Fulhage, Department of Agricultural Engineering, and David Rastorfer, Missouri Natural Resources Conservation Service
Cost and Returns Analysis of Manure Management Systems Evaluated, 2004, under the North Carolina Attorney General Agreements with Smithfield Foods, Premium Standard Farms, and Front Line Farmers, Technology Report: Anaerobic Lagoon and Spray field, by Task 1 Team, Agricultural and Resource Economics, North Carolina State University, Raleigh, NC
Research Summaries
National Center for Manure and Animal Waste Management white paper summary, “Manure Management Strategies” published by North Carolina State University. A two page Executive Summary is available. The full white paper can be ordered from MWPS, Iowa State University.
National Center for Manure and Animal Waste Management white paper summary, Treatment Lagoons for Agriculture published by North Carolina State University. A two page Executive Summary is available. The full white paper can be ordered from MWPS, Iowa State University.
Slurry manure is typically generated in systems where little or no bedding is added to the excreted manure/urine. Slurry manure is typically between 5% and 15% solids. It is “thicker” than liquid manure, but cannot be stacked or handled the same way as solid manure. Some common system for handling and storage of slurry manure are described in this article.
Collecting Slurry Manure
Slotted Floor
The simplest manure collection arrangement for slurry manure is the slotted or perforated floor over a manure collection tank. In this scenario excreted manure simply falls through openings in the floor on which the animals stand and collects in a tank below.
Slotted floors above a manure tank are a simple means of collecting slurry manure.
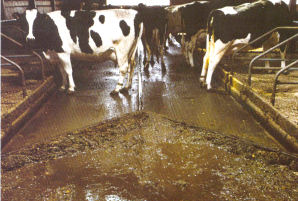
Scrapers
Slurry manure can also be collected using scrapers. In this case the manure is usually confined in an alley (dairy freestall barn) or gutter under slats (swine confinement building). A scraper moves along the length of the alley or gutter and deposits the slurry manure in a reception pit or tank at the end.
Mechanical or tractor-mounted tire scrapers can be used to collect slurry manure in a dairy freestall barn.
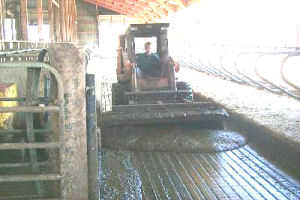
Vacuum
Another type of slurry manure collection device utilizes a vacuum to “suck” slurry manure from a concrete surface and deposit it into a tank. This approach eliminates the need to pump the slurry manure into a tank or wagon.
Labor is reduced when a suction or vacuum is used to collect slurry manure from a concrete alley.
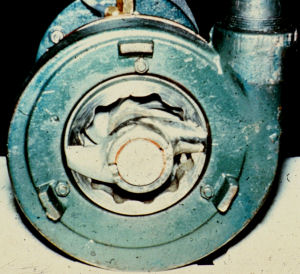
Slurry Pumps
Slurry manure has fluid properties that allow it to be moved by pumps that are specially designed to handle thick fluids containing solids and stringy material. Slurry manure pumps are designed with open-type impellers and usually have cutting or chopping devices at the inlet to the impeller to minimize plugging problems. Low-pressure/high volume slurry pumps are used to fill tankwagons and move manure in other applications where higher pressures are not required. High-pressure slurry pumps are used to move manure through long pipelines and provide the needed pressure for land application in crop fields.
Slurry pumps have open impellers and cutter/chopper blades designed to handle manure with high solids content.
Low-pressure/high volume slurry manure pumps are used to quickly fill manure tankwagons.
High pressure slurry manure pumps can move manure long distances through pipelines to field application equipment.
Transporting Slurry Manure
Tankwagons
Tankwagons can be used to transport or move slurry manure from one point to another, usually from a manure storage facility to a crop field. Tankwagons are available in a variety of sizes from small (1,000 gallons) to quite large (12,000 gallons). Tankwagons typically serve the dual function of transporting slurry manure to a crop field and spreading or injecting the manure into the soil for crop nutrient uptake.
Large tankwagons allow producers to empty manure storage facilities quickly with less labor.
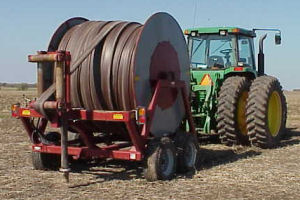
Pipelines
Since slurry manure has fluid properties it can be pumped through pipelines from storage to crop field as an alternative to hauling with a tankwagon. Pumping is a “continuous flow” process whereas hauling is necessarily a “batch” process. Hence pumping can offer significant advantages over hauling in moving large amounts of manure in shorter lengths of time. Tankwagons are generally used to move manure over longer distances although pipelines have been used for distances up to five miles.
Rigid aluminum irrigation pipe has been used for pumping slurry manure in the past. However the labor advantages of using flexible “layflat” tubing for pumping make this type of pipeline more attractive in many cases. Long lengths of this tubing can be stored on reels and placed overland with much less labor than is required with rigid tubing.
Flexible hose or tubing requires less labor for a manure pipeline than rigid pipe.
Slurry Manure Land Application
Field or land application of slurry manure requires that the application devices place the manure in the proper location and at the proper rate for good nutrient management practices. Devices which inject or incorporate manure into the soil are generally preferred since the following advantages are associated with this practice.
Odor is reduced
More nutrients are retained
Runoff potential is reduced
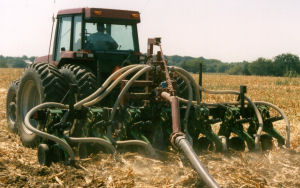
Injection units place manure into the soil to reduce odor, conserve nutrients and minimize runoff.
Some injection units are designed for sod with minimal surface disturbance.
Authors: Charles Fulhage and Joe Harner
Photos: CC 2.5 Charles Fulhage or Joe Harner
Manage Cookie Consent
To provide the best experiences, we use technologies like cookies to store and/or access device information. Consenting to these technologies will allow us to process data such as browsing behavior or unique IDs on this site. Not consenting or withdrawing consent, may adversely affect certain features and functions.
Functional
Always active
The technical storage or access is strictly necessary for the legitimate purpose of enabling the use of a specific service explicitly requested by the subscriber or user, or for the sole purpose of carrying out the transmission of a communication over an electronic communications network.
Preferences
The technical storage or access is necessary for the legitimate purpose of storing preferences that are not requested by the subscriber or user.
Statistics
The technical storage or access that is used exclusively for statistical purposes.The technical storage or access that is used exclusively for anonymous statistical purposes. Without a subpoena, voluntary compliance on the part of your Internet Service Provider, or additional records from a third party, information stored or retrieved for this purpose alone cannot usually be used to identify you.
Marketing
The technical storage or access is required to create user profiles to send advertising, or to track the user on a website or across several websites for similar marketing purposes.