Implementing a Nutrient Management Plan

Why Develop a Nutrient Management Plan?

Developing a nutrient management plan can be a large undertaking. And once it is completed, implementing it puts a livestock producer well on the way to environmental stewardship. A plan may be written for one or more purposes: to satisfy regulatory programs, to qualify for financial assistance or maybe just to gain peace of mind.

The plan should have been developed in close working relationship with the producer, and in so doing, many of the management practices that needed improving will have been worked out and the producer understands the need for the practices and is willing and capable to achieve the items as detailed in the plan. No plan will ever be followed exactly as it was written as weather conditions, soil conditions and market fluctuations create a constant flux for any farming operation. But as these changes arise, the producer who has been involved in the development of the plan is also skilled in how to make changes that continue to be in the spirit of the plan for environmental protection, nutrient accounting and conservation needs. The plan is then teamed up with records that show the plan is either being followed, or documents any deviations.

diagram

Contributed to eXtension CC2.5

Also check out the archived webcast on Improving Implementation of Nutrient Management Plans

Strategic Planning

The planning process needs to include strategic (long term) and tactical (annual) planning. A strategic plan needs to be developed for the whole farm. The strategic plan articulates the policies and guiding principles for the entire farm operation. This type of plan needs to present clear concise statements that reflect the farm’s commitment to conducting operations according to the plan. A good starting point is to create a Whole Farm Nutrient Balance Report This report will provide the farm with a snapshot of the nutrient flows onto and off of the farm. The ideal scenario would be for the nutrients imported onto the farm in feed and fertilizer to be balanced by the nutrients being removed in commodities that are sold off the farm. For farms that have more nutrients than the farm can deal with the options to consider include, reducing purchased inputs (fertilizer and feeds), moving nutrients off the farm, through manure or compost, acquiring more land or reducing animal numbers.

Once the farm knows where it stands with regard to nutrient balance it can begin to formulate the strategy needed to deal with the situation. Farms with too few nutrients or just enough nutrients needed to meet crop requirements can take a straightforward approach to developing a strategic level plan for the farm. In these situations the farm simply needs to commit to making maximum use of the available nutrients by applying the nutrients to a crop field when the field needs the nutrients and at a time of year when the crop can take them up. On the other hand the farm that has too many nutrients has a more complex problem. This farm also needs to apply nutrients to fields needing them when the crop can take them up, but it also needs to develop a strategy to deal with the excess nutrients.

Annual (Tactical) Planning

Plans should be reviewed annually, to see how closely last year’s actions matched the plan, to make any updates to the plan and to project ahead for the next twelve months. This annual update is the time to input any new soil tests, develop the coming crop rotation, document yields, add new fields or delete ones no longer farmed, update animal numbers and incorporate new manure analysis. If major changes are being planned or have occurred, the plan may need significant changes.

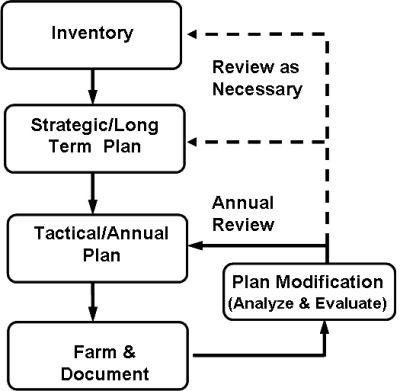
These factors will keep the plan current and meaningful. Conceptually, implementing a nutrient management plan can be thought of a cyclical process composed of a series of steps. Due to the continuous nature of farming several of the steps in the cycle may be happening simultaneously, but for clarity we will consider them one at a time. The figure below shows these steps and the cyclical arrangement of their relationship to each other.

There are instances where the annual/tactical plan can be functional for the coming year, but the strategic/long range plan indicates that annual planning will become more difficult each year. For some farms, it may be easy to nitrogen base the plan, but coming into phosphorus balance will be more difficult, or impossible. P-index strategies should be considered a short term solution; but when a farm is generating more phosphorus than it can utilize, eventually, a P-index strategy will lead to over applications of phosphorus and potential concerns in the years to come, especially if regulations and policy tightens nutrient planning in the future. There will be situations where livestock numbers increase on an operation but there is less land base in the neighborhood. Scenarios such as these, point to the importance of considering both the long term and the annual planning process.

Communicating the plan

Implementation of a plan often hinges on communicating the plan to other family members or hired employees. First, the farm owner needs to show, by his/her actions and words, that the plan is important. Next, a system of communications to the farm employees on what they should do to follow the plan and reporting back, by the employees, of what they have done needs to be put in place. If the farm doesn’t place sufficient value on the plan then the workers will have no incentive to follow the plan and it will collect dust on a shelf.

The tactical/annual plan will be a field-by-field, day-by-day, plan that needs to be communicated to the farm employees or family members. For some workers, training may be needed to impart the skills required to farm under the constraints of the plan. For example operators of manure spreading equipment may need to be taught how to adjust tractor gearing or throttle settings to obtain spreading rates as defined in the plan. This section of the plan will require things like:

  • Field 1 needs 2000 gallons of liquid manure applied per acre in the spring.
  • Field 4 needs to be harvested by September 1 in order to establish a cover crop to protect the slope from erosion during winter.
  • Field 25’s soil P levels are above threshold levels, no manure can be applied.
  • Field 6 needs 200 lbs. of potash.

Records of actions

In return, there needs to be a track record of what did occur, noting any changes to the planned activities. Records are critical to the process because they provide the proof that the plan is being adhered to, as well as valuable information to be used in the formulation of the following year’s plan. If your farming practices are questioned by a regulatory agency or an unhappy neighbor, your records may be your only defense.

Nutrient management plans need to be based on realistic yield information. CC 2.5 Rich Meinert.

There are a number of websites that can provide sample record keeping forms and field worksheets that can be used as is or modified to meet the specific needs of the farm. A couple of suggestions to get started are:

Analyze & Evaluate

This section of plan implementation is where crop records get put to use. One needs to analyze the records kept, to determine on a field by field basis how closely the plan was followed. If the records deviate substantially from the plan the farm needs to provide a reason for the deviation. These explanations need to become part of the permanent crop records so that if someone looks back at the crop records he can obtain a clear picture of what happened and why. The farm may have experienced a wet spring and needed to remove manure from storage to avoid a discharge, but the only field that was dry enough to work had already been spread. By determining what happened and why, the farm presents a rationale to outsiders that it is being environmentally responsible.

Evaluation is the final determination of how well the plan worked. After the individual field comparisons are completed, summary information should be calculated to provide a report card on the nutrient management practices as a whole. It is this summary information that can point out the weak points in the plan. For instance, if fields consistently yield less than the yield goal in the plan then adjustments need to be made. If a number of fields are increasing in soil P over time the application rate for manure or fertilizer may need to be lowered to reduce the accumulation of P.

This management information is the hidden benefit of the NMP process. Detailed farm records will allow farms to use input costs, production data, operating costs and revenues to conduct cost/benefit analysis on production practices. This will allow the farm to see which aspects of the operation are helping or hindering profitability.

Another aspect of evaluating a NMP is to do periodic checks on practices and procedures. Farms need to take a proactive approach to quality control in the area of nutrient management. Manure and fertilizer spreader calibrations will change over time. Farm personnel will begin to forget practices and they do not perform the same task in exactly the same way every time. Field conditions can vary due to weather.

For these reasons farms need to conduct periodic spot checks of manure and fertilizer application. Results from these types of measurements can be used to verify how accurately practices are being followed, and will provide a measure of confidence for the accuracy of the farm’s records in the event of a complaint. For example, if a complaint were filed stating that the farm misapplied liquid manure, it would be in the farm’s best interest to not only produce the crop records to show what was applied, but also to show a series of spot check results, that showed that the applications made on the farm that year were accurate to within plus or minus a real number of gallons per acre. Knowing this confidence interval can provide an extra measure of assurance that the farm actually applied what it said it had.

Implementing a nutrient management plan on a farm can be a daunting task. There is a lot of information to be managed. There are decisions to be made and records to be kept. You don’t need to do it all at once. See what specific resources are available in your state and use this web site to provide suggestions that you can tailor to suit your situation. When a plan is written and implemented correctly a farm can learn a lot about itself, and how to position itself to be in business over the long term with a minimal environmental foot print.

Page Manager: Richard Meinert, Extension Educator, University of Connecticut
Reviewers: Rick Koelsch, University of Nebraska and Doug Beegle, Pennsylvania State University

Solid Manure Sampling Procedures

Developing a nutrient management plan depends on testing manure for nutrient content. Your manure test results are only as good as your sample. This page outlines recommended ways to sample solid manure from open feedlots.

Sample During Loading

The recommended sampling for solid manure is to sample while loading the spreader. Sampling the manure pack in a barn directly has been shown to result in very variable results and is not recommended. Take at least 5 samples during the process of loading several spreader loads and save them in a bucket. When all of the samples are collected, thoroughly mix the samples and take a subsample from this to fill the lab manure test container.

Sample Manure During Spreading

Spread a tarp or sheet of plastic in the field and spread manure over this with the manure spreader. Do this in several locations and with several loads of manure. Collect the manure from the tarp or plastic sheet in a bucket. Mix the manure collected from different locations and spreaders, and take a subsample from this to fill the lab manure test container. This procedure is usually only practical for more solid manures.

Photo courtesy USDA NRCS

Sampling Daily Haul Manure

Place a 5 gallon bucket under the barn cleaner 4 or 5 times while loading the spreader. When all of the samples are collected, thoroughly mix the samples and take a subsample from this to fill the lab manure test container. Repeat this several times throughout the year to determine variability over time.

Sampling Manure in a Poultry House

Collect 8-10 samples from throughout the house to the depth of the litter to be removed. Samples near feeders and waterers can be very different. Collect samples from these areas proportional to the space they occupy in the house. When all of the samples are collected, thoroughly mix the samples and take a subsample from this to fill the lab manure test container. A sample taken while loading the spreader or during spreading is likely to be a more representative sample.

Sampling Stockpiled Litter

Take 10 samples from different locations around the pile at least 18 inches below the surface. When all of the samples are collected, thoroughly mix the samples and take a subsample from this to fill the lab manure test container. Large diameter auger bit and portable drill or soil sampler can be used to access manure deep within pile.

Taking a sample from a manure stockpile Taking representative sample from all subsamples mixed together in a bucket

Sampling stockpiled manure. Picture Source: Manure Testing for Nutrient Content

Sampling Manure from an Open Lot

These videos were produced by the Iowa Learning Farms project.

Sampling Stockpiled and Composted Manure

Related Web Pages

Overview of Manure Testing

Page Authors: Douglas Beegle, Penn State University and John Peters, University of Wisconsin

Estimating Manure Density

Livestock and Poultry Environmental Learning Center:

Home Page

All articles about:

Nutrient Management

Manure Testing

Manure Testing

Procedure for Estimating Manure Density

Manure density varies with moisture content primarily depending on the amount of bedding. To calculate a more accurate estimate of manure density, use the procedure below:

  1. Weigh an empty 5-gallon bucket. Record the weight in pounds.
  2. Fill the 5-gallon bucket with a typical sample of the manure and weigh the bucket and manure. Record the weight in pounds.
  3. Subtract the weight of the empty bucket (step 1) from the weight of the bucket with manure (step 2). Record the weight of the manure in pounds.
  4. Repeat steps 2 and 3 at least 5 times and calculate an average weight. Record the average weight in pounds.
  5. Divide the average weight by 5 to determine the density in pounds per gallon. OR
  6. Multiply the average weight by 1.5 to determine the density in pounds per cubic foot.

Related Web Pages

Liquid Manure Sampling Procedures

When testing manure, your nutrient management plan is only as good as your ability to obtain a representative sample. In liquid manure storage, agitation is critical to spreading uniform manure and to getting a representative sample. Agitating for 2-4 hours is the minimum. Depending on the type of storage longer agitation times may be required. The agitation for sampling should be similar to the agitation done when the storage is emptied. For this reason the most practical time to sample is when the storage is being emptied for field application.

If the storage is not adequately agitated there will likely be stratification. The figure below illustrates how manure analysis can vary within a storage without adequate agitation. In this example manure in the last 15 loads spread from this storage has 2 to 3 times more phosphorus than in the first 45 loads spread. If the storage is known to be stratified, separate samples should be taken as the manure consistency changes during emptying.

diagram

cc2.5 Les Lanyon

Sampling As Manure Storage Is Emptied

Agitate the storage thoroughly before sampling. Use a bucket to collect at least 5 samples during the process of loading several spreader loads and save them in the bucket. When all of the samples are collected, thoroughly mix the samples and take a subsample from this to fill the lab manure test container. When filling containers with liquid manure never fill the container more than ¾ full. If samples are collected over a several hour period, the bucket with manure sample should be stored on ice to limit ammonia losses.

Sample Manure When Pumping From Storage. Photo courtesy of Ontario Ministry of Agriculture, Food and Rural Affairs. Photo Source: http://www.thecattlesite.com/articles/1307/sampling-liquid-manure-for-analysis


Sampling From the Manure Storage

Picture Source: http://www.extension.iastate.edu/pages/communications/epc/Winter02/manure.html

Sampling a storage directly is much more difficult and likely to result in more variable results than sampling as the manure is loaded into the spreader. Agitate the storage thoroughly before sampling. Use a small bucket or tube to collect at least 5 samples from different locations in the storage. Combine these samples in a bucket and thoroughly mix the samples and take a subsample from this to fill the lab manure test container. When filling containers with liquid manure never fill the container more than ¾ full.

Liquid Manure Sampling Video

This video from the Iowa Learning Farms Project shows two sampling techniques for liquid manure storage prior to agitation. As indicated above, samples of agitated liquid manure should be obtained when possible, but in cases where the information from the lab analysis (which can take several days) is needed before manure can be applied to crop land.

Part 2: Sampling Liquid Manure

Sampling Manure During Application

This method is good for irrigated manure. Place buckets around the field to catch manure from the spreader or irrigation equipment. Place these to collect manure from more than one spreader load. Combine and mix the manure collected from different locations, and take a subsample from this to fill the lab manure test container. This method may give you “crop available ammonia nitrogen” as any ammonia losses may have already occurred prior to reaching bucket. What reaches the bucket is likely to soak into the soil and be available to the crop.

Related Web Pages

Overview of Manure Testing

Page Authors: Douglas Beegle, Penn State University and John Peters, University of Wisconsin

Total and Available Nutrients In Manure

Standard manure analysis procedures determine the total N, P, K, and other nutrient content in the manure. Some special analyses such as ammonium-N and water extractable P determine the concentration of specific forms of nutrients in manure. These special tests should be clearly labeled as such on the manure test report.

Availability of Manure Nutrients

However, the total amount of nutrients in manure may not all be available or may become available only over a period of time. States and regions have developed “availability factors” that are applied to the manure analysis results to estimate the availability of the manure nutrients to the immediate crop and to future crops. This availability is usually a fertilizer equivalent availability. This is important because soil test recommendations are made on the basis of applying fertilizer nutrients. This means that by using the availability factors you can substitute “available” manure nutrients for recommended fertilizer nutrients on a 1 to 1 basis.

Because availability is influenced by local climate and soil conditions and may be customized for local management practices, it is very important that availability factors developed for the area where the manure is applied are used. Most state land grant universities have published availability factors for manure nutrients. Check with your local cooperative extension service for the appropriate factors for your area or State Specific Manure Nutrient Management Information

diagram

cc2.5 Doug Beegle

Some labs will apply availability factors to the analysis results and show “Available Nutrients” on the manure test report in addition to the analyzed total nutrient concentrations. It is very important to check to see if these factors are appropriate for the area where the manure will be spread. Some labs serve a large geographic area and while their analytical results may be excellent, availability factors may not be appropriate for all areas that they cover. It is always a good practice to check with the local cooperative extension service to make sure the availability factors a lab is using are appropriate for that area. Even if the availability factors use by a lab are not appropriate, the analytical results for total nutrients can be used with local availability factors to get valid estimates of available nutrients.

Related Web Pages

Page Authors: Douglas Beegle, Pennsylvania State University and John Peters, University of Wisconsin

Manure Test Results

Livestock and Poultry Environmental Learning Center:

Home Page

All articles about:

Nutrient Management

Manure Testing

Contents


Which Tests Do I Need?

Most labs have a basic manure test with the option to add other tests for an additional fee. Make sure the tests or the package you select includes at least the following analyses for nutrient management planning:

  • % Moisture or % Solids,
  • Total N,
  • Ammonium-N (NH4-N),
  • Total P, and
  • Total K.

Other analysis that may be useful in some situations include: pH, Carbon:Nitrogen ratio (C:N), water extractable P, calcium carbonate equivalent, secondary nutrients (Ca, Mg, & S), and micronutrients.

Manure Test Results Can Be Reported Differently

Dry Matter or As-Sampled?

Manure analysis results can be reported in several different ways. It is important that you clearly understand how your results are reported. The first consideration is whether the results are reported on an as-sampled basis or on a dry-weight (dwt) basis. Most agricultural labs that do manure testing report the results on an as-sampled basis. If the results are reported on a dry-weight basis the analyses will have to be converted back to as-sampled to be practical for use in a nutrient management plan. Example calculations for converting analyses results from % dry-weight (% dwt) or ppm to “as-is” results (lb/ton or lb/1000 gal are at Common Manure Test Results Conversions.

Reporting Units

Another, issue with reporting manure test results in the units used. When results are reported on an as-sampled basis the most common units used are lb/ton for more solid samples and lb/1000 gal for liquid samples. However, carefully check the units on the manure test because other units are sometimes used. For example, some labs report liquid manure test results in lb/100 gal. Lb/acre-inch may be preferred by producers using irrigation systems. Also, particularly when results are reported on a dry-weight basis, percent (%) and parts per million (ppm) may be used. Example calculations for converting analyses results from % dry-weight (% dwt) or ppm to “as-is” results (lb/ton or lb/1000 gal) are at Common Manure Test Results Conversions.

Elemental or Oxide?

Results may be reported as the elemental form for example P and K, or in the oxide form as P2O5 and K2O. Most agricultural labs that do manure testing report the results in the oxide form since this is how fertilizer recommendations are made. If the results are reported in the elemental form, they will have to be converted to the oxide form for use in nutrient management planning. Example calculations for converting analysis results from elemental to oxide are at Common Manure Test Results Conversions.

Solid or Liquid?

Finally, there may be situations where the results are reported for a liquid ie. lb/1000 gal but the manure is spread on a ton basis ie. tons/acre. The density of the manure can be used to convert from liquid to solid analysis. Example calculations for converting analysis results from liquid to solid or solid to liquid at Common Manure Test Results Conversions.

For more information see Reporting Manure Analysis Results taken from the publication “Recommended Methods of Manure Analysis”.

Related Web Pages

Page Authors: Douglas Beegle, Pennsylvania State University and John Peters, University of Wisconsin

Calibration of Manure Application Equipment

In order to beneficially apply nutrients contained in animal manure to crops and to protect the environment, it is necessary to calibrate land application equipment. In addition, many states require calibration of manure application equipment on a regular basis via regulations and permitting requirements. Records of calibration results may be a requirement of your permit.

Calibration Procedures Will Vary

Depending on the type of manure or the type of equipment being used to apply manure, there are different calibration procedures to follow. See the following pages for information on specific procedures.

Calibrating Manure Application Equipment Makes Economic and Environmental Sense

Proper calibration of manure application equipment is necessary to insure that field application rates are consistent with nutrient management plans. As nutrient plans have attempted to more accurately balance nutrient supplied by manure and fertilizer and crop requirements, calibration is also critical to avoid under applying nutrients and reducing yields.

Properly calibrated and operated equipment will help eliminate:

  • ponding or runoff of manure into waterways
  • leaching of nutrients and pathogens into shallow groundwater
  • accumulation of nutrients or metals in the soil
  • reduced crop yields from insufficient nutrients

Manure is a valuable resource that should be applied in an ecological and environmentally sensitive manner. As the value of the nutrients in manure increases due to increases in commercial fertilizer cost, calibration of manure application equipment becomes even more important.

Other good reasons to calibrate are to monitor equipment performance changes over time (wear and tear) so that timely maintenance is performed, and to troubleshoot any equipment operational problems. Calibration should be done annually even if regulatory requirements require less frequent calibration. Also, it is a critical to re-calibrate when the consistency or liquid content of the waste changes considerably as changes in material characteristics can change the performance of the application equipment.

Tractor

cc2.5 Garry Grabow

Important Considerations for Calibrating Manure Application Equipment

Calibration of equipment used to land apply manure considers two aspects:

  1. the amount of manure (nutrients) applied, and
  2. how uniformly the manure is applied over the field.

Some nutrient management plans may be based upon nitrogen limited application, while other will be based on phosphorus limited plans; regardless it is critical to know the amount and uniformity of applied manure. Depending upon the equipment used, calibration will involve field measurement of flow or unloading rates, equipment speed and settings, operating pressure, application width, and application overlap.

Manure application equipment can be categorized into three types:

Application equipment varies depending upon the type of manure, e.g. lagoon liquid, poultry litter, or fresh manure. Calibration of each type of equipment will vary in which measurements are required and how application rate and uniformity are quantified and assessed.

Recommended Educational Resources

Author: Garry Grabow, North Carolina State University
Reviewers:Marsha Mathews, University of California-Davis, Rick Koelsch, University of Nebraska, and Doug Beegle, Pennsylvania State University

Calibrating Solid Manure Application Equipment

Why should you calibrate solid manure spreaders? Simple, because you should know how much manure was applied to your fields. Combined with a manure testing program, you can calculate the amount of manure nutrients that were applied. This can save money on commercial fertilizer purchases AND improve water quality. Related: Calibrating liquid manure spreaders and irrigation equipment.

What Can Cause Manure Application Rates to Change?

Solid spreaders can have poor uniformity if operated improperly, so proper operation and calibration of these types of systems are critical. The system needs to be recalibrated if any of the following are changed:

  • Tractor speed
  • Gate opening (and spinner settings for spinner spreaders)
  • RPM
  • Width of spread
  • Manure characteristics
  • Wind
  • Slope
  • Operator (experience and consistency)

It is helpful to know the capacity and setting ranges available with solid spreaders. Solid spreader capacity is noted in the manufacturer’s specifications and may be listed in tons, cubic feet or cubic yards. Capacity is normally listed in struck level (flush with top of unit) height but may also be rated in “heaped” load.

This video shows how tarps that are laid out and manure spread on them can be collected and weighed. it was produced with smaller farms in mind, but the concepts and procedures apply to equipment of all sizes. Produced by: Rutgers University Cooperative Extension.

What Are the Steps in Calibrating Solid Manure Spreaders?

This video shows a process for weighing the  manure spreader and measuring the area over which manure was applied. The worksheet referenced is Know How Much You Haul Produced by the University of Wisconsin Cooperative Extension.

Tarp Method

Normally calibration of solid spreaders will involve collecting the discharged manure in a tarp to determine application rate and collecting manure in a series of pans laid across the travel path to assess spread pattern, uniformity and to adjust pass width. Click on the following link for an illustration of the procedure for this method. (Source: Rick Koeslch, University of Nebraska). Manure density is normally determined to allow conversion from volume to weight (e.g. tons) applied.

Weighing the Spreader

If manure spreader capacity can be weighed, then the only field measurements required are distance traveled to empty the spreader and width of spread pattern (or distance you move laterally with each pass through the field). From that information, a fairly simple estimate of application rate can be made.

Moisture content of manure has a large impact on manure density and actual spreader capacity. When calibrating, it is important to correctly interpret the nutrient analysis reports provided by the analytical lab. Some analyses report manure nutrient concentration at the moisture content submitted. Other analysis reports may give the nutrient analysis at a moisture content that is different than either the sampled material or the material to be applied. For accurate calibration, match moisture content of manure samples with moisture content of the manure being spread.

Adjustments to achieve the proper application rate and uniformity include adjusting travel speed, gate openings and hammer clearance, and adjusting spinners for spinner spreaders. Narrowing the effective width (pass distance) generally increases application uniformity but also increases application rate.


Types of Solid Manure Application Equipment

Manure is generally handled as a solid at a solids content of 20% or more. Solid manure spreaders come in various types. Spinner spreaders use spinning disks at the rear of the unit to propel the manure, box spreaders use a paddle and/or auger to discharge manure from the rear of the unit, and side discharge spreaders typically use augers and flailing hammers to “throw” the manure out the side of the unit. Spinner spreaders are used to apply poultry litter and are widely used as commercial fertilizer applicators. Side discharge units can handle materials with a wide range of moisture contents. Rear discharge spreaders are commonly used with scraped manure solids from open lots and manures with significant bedding.

Recommended Educational Resources

Author: Garry Grabow, North Carolina State University
Reviewers: Marsha Mathews, University of California-Davis, Rick Koelsch, University of Nebraska, Doug Beegle, Pennsylvania State University

Management of Land-Applied Manure Phosphorus

Land applied manure is an excellent source of phosphorus (P) for meeting crop growth needs but needs to be managed to minimize P delivery to surface waters. See Phosphorus in Aquatic Systems. Phosphorus movement from agricultural land to surface water is determined by the interaction of:

  • soil characteristics and management practices with
  • mechanisms of P transport, such as runoff and erosion.

Management Practices

Several soil and P management options may be considered to reduce P delivery to surface waters:

  • Maintain soil test P levels near the optimum for crop growth. Risk of loss is greatest when soil test P levels are excessively high. Soil test P is often increased with repeated manure application.
  • Practice conservation tillage or no-tillage to minimize erosion, and therefore, the potential of P delivery.
  • Apply manure when there is a relatively low risk of runoff during the weeks after application. Avoid application on frozen and snow-covered soil as a runoff event may occur with snow-melt.
  • Incorporation of manure may reduce potential for P runoff but may increase the potential loss to erosion. For more see Agricultural Phosphorus Management.

Injection of slurry manure can reduce risk of P runoff if ground cover is maintained to prevent erosion. CC 2.5 Charles Fulhage or Joe Harner

Phosphorus Delivery

Phosphorus transport to surface waters is largely determined by erosion and runoff, distance to concentrated water flow or to surface waters, and by management practices that trap sediments and nutrients carried by runoff and erosion before these enter surface waters.

  • The potential for erosion and runoff are determined by the amount of precipitation and intensity of rainfall events, slope steepness and length, soil type, crops grown, and crop and conservation management practices. Some of the erosion P is readily available to aquatic vegetation and some eventually becomes available.
  • Conservation practices, such as terraces and farm dams, that reduce runoff, erosion and sediment delivery generally reduce P delivery to surface waters.
  • Vegetative filter strips on hillsides and well-placed vegetative buffer zones along streams can be effective in filtering out sediments and some nutrients before they enter surface waters.
  • Most of the P that enters surface waters may come from only 10-20% of the area of a watershed, and especially from areas that are very near to concentrated water flow. Alternative management practices may be needed for these sensitive areas.

Potential for P loss from a field, or part of a field, to surface waters is often assessed using a P index that considers field and management factors as well as transport factors.

Educational Resources on Manure Phosphorus Management

  1. Basic Concepts of Soil and Water Phosphorus
  2. Field and Management Factors
  3. Transport Factors
  4. Assessment of the Risk of Agricultural P Delivery

Extension Resources on Manure Phosphorus Management

Scientific Resources on Manure Phosphorus Management

Page Manager: Charles S. Wortmann, University of Nebraska-Lincoln

Calibrating Irrigation Equipment for Manure Application

Irrigation equipment can be used to land apply manure with a solids content of up to 2-3 percent depending upon the type of equipment used and nozzle size. The types of systems typically used are stationary (also called solid-set), traveling guns, and center pivots. Irrigation equipment is typically used to land apply liquid manure from anaerobic lagoons and runoff holding ponds. If applied manure is undiluted, calibration requirements may differ slightly from those systems using diluted manure. If manure is diluted with freshwater, nutrient concentration must be adjusted by the dilution ratio when calculating nutrient rates. Always check with your state regulatory agency for calibration and reporting requirements.

Related: Calibrating solid manure spreaders and irrigation equipment.

As with the other types of equipment used for land applying manure, calibration consists of verifying application rates and application uniformity. Application rate and uniformity is measured by collecting applied manure in rain gages that are placed in a line for traveling gun and center pivot systems or in a grid for stationary systems. Systems using undiluted manure may require measurement and reporting of application rate from the gun or nozzle and not what is collected in a rain gage if plant available nutrients are calculated to include evaporative losses and volatilization.

If measuring application rate from the gun, a flow meter or pressure measurement at the nozzle and a manufacturer’s performance chart for the gun/sprinkler and nozzle will be required. Collected depths are used to calculate commonly-used measures of irrigation equipment uniformity such as the Christiansen uniformity coefficient (CU or Uc) or distribution uniformity (DU). Details of how to setup uniformity evaluations and calculate measures of uniformity and application rates are given in the links in a paragraph at the end of this document.

Uniformity of irrigation-type equipment can be affected by:

  • Operating pressure
  • Nozzle condition
  • Pump impeller condition
  • Wind
Center pivot irrigation

It is important that these types of systems be operated as designed. Normally this means that pressure and flow rate should be field-verified in the calibration procedure and compared to the design values or the ranges recommended by the manufacturer. Pressure should always be measured at the nozzle, not at the pump or other location. Pressure can be measured either with a pressure gauge mounted on the sprinkler riser or mounted on the gun body (for big guns) or measured using a pitot tube placed directly in the nozzle stream. For center pivots with drop nozzles, pre-set pressure regulators are normally located on the drop tubing, so nozzle pressure is known. In addition to pressure and flow rate measurement, the wetted diameter of the sprinkler or gun (for solid set and traveling gun systems respectively) should be measured.

It is generally recommended that flow rates be within 10 percent of the design rate, and that wetted diameter be within 15 percent of that specified in the manufacturer’s chart at the measured nozzle pressure. Flow rates may be obtained either by using a flow meter or by using values obtained from the manufacturer’s chart at the measured pressure. For animal waste systems, flow meters are normally temporarily placed in the main irrigation line either in-line or temporarily strapped on depending upon the type of flow meter used.

Adjustments to achieve the proper application rate and uniformity include adjusting operating pressure, travel speed (for traveling gun or pivot systems), replacing worn nozzles, and operating systems when there is little wind. Changes in equipment (e.g. nozzle size) should not be done without consultation with an irrigation specialist.

Recommended Educational Resources

Author: Garry Grabow, North Carolina State University Reviewers: Marsha Mathews, University of California-Davis, Rick Koelsch, University of Nebraska

Photo: CC 2.5 Charles Fulhage or Joe Harner